How to Waterproof Roof Penetrations
Few things are more frustrating, or potentially damaging, than discovering a leak after you've gone through all the effort of installing your off-grid solar system. That drip-drip-drip isn't just annoying; it can lead to serious structural damage, mold growth, and compromise your electrical components. This comprehensive guide will walk you through everything you need to know about properly waterproofing roof penetrations, ensuring your off-grid solar setup remains dry, safe, and reliable for years to come.
Understanding the Risk: Why Waterproofing is Critical
When you decide to embrace the freedom of off-grid solar, you're investing in independence. But that independence comes with responsibilities, and chief among them is protecting your dwelling from the elements, especially when you start making holes in the roof! It’s not just about keeping the rain out; it’s about preserving your entire investment and ensuring safety.
The Silent Threat of Water Intrusion
Water has a way of finding the path of least resistance, and even the tiniet pinhole can become a significant leak over time. When we talk about roof penetrations for solar, we're not just thinking about direct rain. We're talking about melting snow, wind-driven rain, and even condensation that can creep into vulnerable spots. These are often subtle, unseen threats that work slowly, causing damage long before you ever notice a stain on the ceiling. It’s a bit like a ticking time bomb; you know it's there, but you don't always know when it will go off.
Many folks underestimate the power of capillary action, where water can climb against gravity through tiny gaps. A poorly sealed screw hole, a flashing that isn't snug, or a sealant that degrades in UV light can all become entry points. What starts as a small amount of moisture can saturate insulation, rot wood, and corrode electrical connections, making your solar system not just leaky, but potentially dangerous.
Consequences of Poor Waterproofing
The repercussions of inadequate waterproofing extend far beyond a simple drip. Structural damage is a major concern; wood framing can rot, ceiling joists can weaken, and over time, the structural integrity of your roof can be severely compromised. Imagine the weight of your solar panels on a compromised roof – it's a terrifying thought. Beyond structural issues, water intrusion leads to mold and mildew growth, which are not only unsightly and smelly but also pose serious health risks, especially in enclosed spaces like RVs or cabins.
Electrically, water and electricity are a disastrous combination. Exposure to moisture can corrode wiring, short out components like inverters or charge controllers, and even lead to electrical fires. Replacing damaged solar equipment, especially critical components like batteries, is incredibly expensive and can bring your off-grid lifestyle to a screeching halt. So, while waterproofing might seem like an extra step, it's a non-negotiable part of your Off-Grid Solar Installation Guide.
Why DIYers Often Struggle
It's tempting to think of waterproofing as simply applying some caulk, but it's a science and an art. Many DIYers, myself included in my early days, often struggle because they don't use the right materials, don't prepare the surfaces correctly, or rush the job. Store-bought silicone caulk might seem like a quick fix, but it often lacks the flexibility, adhesion, and UV resistance required for a long-term outdoor application, especially on a vibrating RV roof or a cabin that experiences extreme temperature swings.
Another common pitfall is not understanding the anatomy of a roof. Different roofing materials react differently to sealants and penetration methods. What works for an asphalt shingle roof will likely fail on a metal roof. Without proper research and attention to detail, a DIY installation can quickly turn into a costly repair project. It’s also crucial to consider the long-term; a seal that looks good on day one might degrade rapidly under constant sun, rain, and temperature fluctuations.
Essential Tools and Materials for Waterproofing
Getting the job done right means having the right arsenal of tools and materials. Skimping here is a false economy that will almost certainly lead to headaches down the line. Think of it as investing in peace of mind.
Key Sealants and Adhesives
Choosing the correct sealant is paramount. Not all sealants are created equal, and their properties vary widely. For solar installations, you need materials that offer excellent adhesion, flexibility, UV resistance, and durability against temperature extremes.
- Self-Leveling Sealants: These are fantastic for horizontal surfaces, especially on RVs or flat roofs, as they flow into gaps and create a watertight seal. Brands like Dicor offer popular self-leveling sealants widely used in the RV industry. They are designed to adhere well to various materials and withstand expansion and contraction. You can often find these on sites like Amazon.
- Lap Sealants/Construction Sealants: For vertical joints or areas where you need a thicker bead that won't run, a non-sagging lap sealant or a high-quality construction adhesive/sealant is ideal. Look for products designed for exterior use with excellent weatherproofing properties, such as those made from polysulfides, polyurethanes, or advanced polymers. These often require a caulking gun.
- Butyl Tape: This highly sticky, pliable, and waterproof tape is excellent for creating a primary seal between mounting feet or brackets and the roof surface. It compresses to fill voids and provides an immediate watertight barrier. It’s often used in conjunction with screws and an exterior sealant for a multi-layered approach.
Remember, always check the compatibility of your chosen sealant with your specific roofing material. Some sealants can react negatively with certain plastics or rubber compounds, leading to degradation.
Hardware and Flashing Components
The hardware you use for mounting your solar panels is just as important for waterproofing as the sealant itself. The right flashing and mounting feet are designed to integrate seamlessly with your roof, providing a mechanical barrier against water intrusion.
- Mounting Feet/Standoffs: These are the brackets that elevate your solar panels off the roof surface. High-quality mounting feet often come with integrated rubber gaskets or channels designed for sealant application. For asphalt shingle roofs, specialized flashing kits like those from Renogy or IronRidge are crucial. These often slide under the shingles, diverting water away from the penetration point and providing a secure base for the mounting feet.
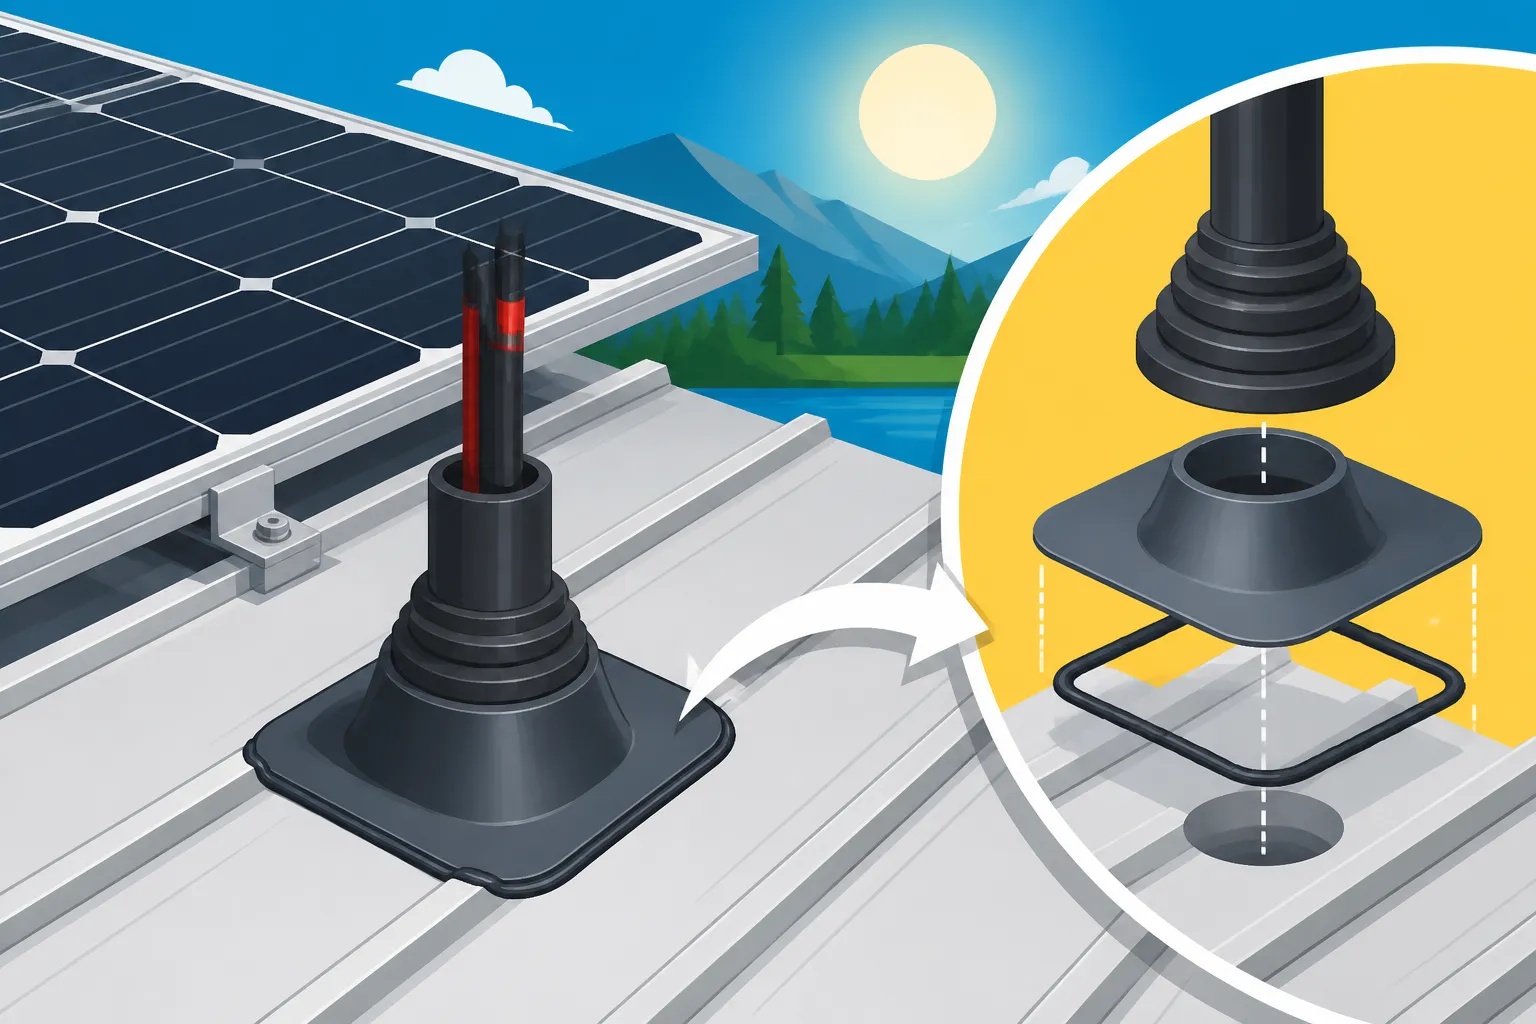
- Cable Glands/Entry Plates: For running electrical cables from your panels into your dwelling, dedicated cable glands or entry plates are essential. These typically consist of a housing that is sealed to the roof and incorporates watertight compression fittings for the cables. A good Off-Grid Solar Wiring Best Practices approach will always include proper cable entry. Using a simple drilled hole and glob of caulk is an invitation for leaks.
- Stainless Steel Fasteners: Always use stainless steel screws, bolts, and washers. They resist corrosion, which is vital for long-term integrity and preventing rust stains or structural failure. Galvanized or zinc-plated fasteners will eventually rust, compromising both the structural connection and the seal.
Safety Gear and Preparatory Items
Before you even think about applying sealant, you need to prepare your work area and ensure your safety.
- Safety Gear: Working on a roof can be dangerous. Always wear appropriate non-slip footwear, and consider a safety harness if you're working on a steep pitch. Gloves are essential to protect your hands from sealants and rough surfaces. Eye protection is also a must, especially when drilling or cutting.
- Cleaning Supplies: Proper adhesion depends on a clean, dry, and oil-free surface. You'll need isopropyl alcohol, mineral spirits, or a dedicated degreaser, along with rags or brushes, to thoroughly clean the area around each penetration. Don't underestimate this step; a dirty surface is a guaranteed leak waiting to happen.
- Tools for Fastening and Cutting: You'll need a drill with appropriate bits for pilot holes, a socket set or wrench for tightening bolts, and potentially a utility knife for trimming butyl tape or flashing. Having a reliable stud finder or a way to locate rafters is critical for secure mounting and proper How to Install Roof-Mounted Solar Panels.
Step-by-Step Guide to Waterproofing Roof Penetrations
Proper waterproofing isn't a single action; it's a sequence of deliberate steps, each building upon the last to create an impermeable barrier. Rushing or skipping any of these steps can compromise the entire system.
Pre-Installation Planning and Preparation
Before you even make the first cut or drill the first hole, careful planning is paramount. This stage sets the foundation for a successful, leak-free installation.
First, map out your entire system layout, including panel placement, mounting points, and cable runs. Identify exactly where each roof penetration will occur. This allows you to plan around existing roof features (vents, chimneys, valleys) and choose the safest, most effective entry points. For specific guidance on layout, you might refer to our guide on How to Wire an Off-Grid Solar System. Once locations are determined, thoroughly clean the roof surface around each planned penetration. Remove all dirt, debris, leaves, moss, and any loose particles. For stubborn grime or oily residues, use a dedicated cleaner like isopropyl alcohol or mineral spirits. The goal is a pristine surface for maximum sealant adhesion. Allow ample time for the surface to dry completely – moisture is the enemy of a good seal.
Next, mark your drill points accurately. Measure twice, drill once! If you're using flashing, make sure to mark where the flashing will sit, not just the bolt hole. It's often helpful to pre-drill small pilot holes from the top down, then use a larger bit from the bottom up to prevent splintering if you're drilling through wood or composite. For mounting feet, ensure you are drilling into a structural member like a rafter or a crossbeam for maximum security. This is where a good stud finder comes in handy.
Sealing the Penetration Point
This is the core of the waterproofing process, where you create the physical barrier against water. A multi-layered approach is almost always best.
Start by applying butyl tape to the underside of your mounting feet or flashing plates. This tape should completely cover the area where the mounting hardware will contact the roof surface and extend slightly beyond the edges of any drilled holes. As you press the mounting foot down, the butyl tape will compress and squish into any tiny irregularities, creating an initial, highly effective watertight gasket. Make sure the tape is free of wrinkles and fully adheres.
Once the butyl tape is in place and the mounting feet are securely fastened with stainless steel hardware, apply your primary exterior sealant. This is where your self-leveling or construction sealant comes in. For mounting feet, create a generous bead around the entire base of the foot, ensuring it covers the fastener heads and overlaps onto the roof material. For cable entries, apply sealant around the base of the cable gland and generously fill any gaps where cables pass through. Don't be shy, but also don't make an unsightly mess. The goal is a continuous, unbroken seal that directs water away from the penetration. Think of it as creating a mini "water dam" around each point.
Post-Installation Inspection and Curing
The work isn't over once the sealant is applied. Proper curing and thorough inspection are vital to confirm your efforts have been successful.
Most sealants require a specific curing time, often ranging from 24 hours to several days, depending on temperature and humidity. Do not disturb the seals during this time. Check the product's datasheet for exact instructions. Premature exposure to heavy rain or physical disturbance can compromise the bond. During this period, it’s a good idea to cover the area with a tarp if heavy weather is expected, just to be safe.
Once the sealant has fully cured, perform a meticulous visual inspection of every single penetration point. Look for any gaps, cracks, or areas where the sealant might have pulled away. Pay close attention to corners and edges. Sometimes, a tiny bubble or void can appear during curing, which needs to be addressed immediately with a small dab of fresh sealant. Check for proper adhesion by gently pushing on the edges of the sealant bead; it should feel firmly attached.
Finally, and perhaps most importantly, perform a water test. This can be as simple as using a garden hose to thoroughly douse the areas around your penetrations, simulating heavy rainfall. Have someone inside monitoring for any signs of leakage. This proactive step can save you immense hassle down the road. If you find even the slightest drip, dry the area, apply more sealant, allow it to cure, and re-test. This diligence is what makes the difference between a reliable system and one that causes constant worry. Our guide on Off-Grid Solar Installation Mistakes to Avoid delves into more common errors.
Common Roof Types and Specific Waterproofing Considerations
Different roofs require different approaches to waterproofing. What works perfectly on a flat RV roof won't cut it on a residential shingle roof, and vice-versa. Understanding your specific roof material is key.
Asphalt Shingle Roofs
Asphalt shingle roofs are one of the most common types, but they present unique challenges for solar installations because of their layered, overlapping nature. The primary rule here is to maintain the natural water shedding properties of the shingles.
When installing mounting feet on an asphalt shingle roof, you absolutely must use flashing plates specifically designed for shingles. These are typically thin, flat metal plates with a raised collar that creates a watertight seal around the lag bolt or fastener. To install them, you carefully lift the shingle directly above your penetration point, slide the flashing under that shingle and the one to its sides, so it sits flat against the roof decking. The hole for your lag bolt is then drilled through the flashing plate and into a rafter. This effectively places the flashing beneath the overlapping shingle, ensuring any water that runs down the roof flows over the flashing, rather than finding a way in.
Once the flashing is in place and the lag bolt is tightened, a generous application of a high-quality, UV-resistant exterior sealant (often a silicone or polyurethane-based product) is crucial. Apply this sealant around the collar of the flashing and over the head of the lag bolt. Some installers also add a small bead of sealant under the edges of the flashing where it meets the shingles to prevent wind-driven rain from lifting it, though the primary seal comes from the shingle overlap. When planning your Off-Grid Solar Cost: Complete Breakdown, remember to budget for these specialized flashing kits.
Metal Roofs and Corrugated Panels
Metal roofs, whether standing seam, corrugated, or R-panel, offer excellent durability but require very specific waterproofing techniques. Drilling directly through a metal panel without proper sealing will inevitably lead to leaks.
For corrugated or R-panel metal roofs, the key is to seal in the valleys, not on the ridges. Water naturally channels down the valleys of the corrugated profile. Using mounting hardware that attaches directly to the ridges and then sealing around the base can be tricky, as water might pool. Instead, specialized mounting brackets often include rubber gaskets or grommets that compress when fastened, creating a watertight seal around the fastener itself. Fasteners often go through the flat part of the ridge, or sometimes into a purlin underneath, with specialized seals. Using self-tapping screws with integrated rubber washers is a common method, but these should always be supplemented with a high-quality sealant.
For standing seam metal roofs, the best approach is to use non-penetrating clamps. These clamps attach directly to the standing seams of the metal panels, securing your solar array without creating any holes in the roof surface. This method completely eliminates the need for waterproofing at the panel attachment points, making it the most robust and preferred method. You can find excellent non-penetrating clamps from various manufacturers like S-5! or Renogy. If you must penetrate for something like a cable entry, use a specialized boot or flashing designed for metal roofs, often called a master flashing or pipe flashing, which is sealed with high-temperature sealant and screws. Our guide on How to Install Solar on a Metal Roof offers more insights.
Rubber and TPO Roofs (RV/Flat Roofs)
Rubber (EPDM) and TPO (Thermoplastic Polyolefin) roofs are common on RVs, trailers, and some flat-roofed buildings or tiny homes. These materials are flexible and durable, but they require specific types of sealants and careful handling.
The main challenge with these roofs is their flexibility and the specific chemical composition of the roofing material. Many standard sealants can degrade or react poorly with EPDM or TPO over time, leading to cracking or loss of adhesion. For this reason, it's crucial to use sealants specifically formulated for RV or rubber roofs, such as those made by Dicor, which are readily available on platforms like Amazon. These are often self-leveling, allowing them to flow and create a smooth, continuous seal over screws and mounting feet.
When installing solar on an RV or tiny home with a rubber or TPO roof, always use generously sized mounting feet that spread the load. Apply a thick bead of the appropriate self-leveling sealant around the entire perimeter of the mounting foot, ensuring it completely encapsulates the screws. Many RV owners also employ butyl tape as an initial layer under the mounting feet before applying the liquid sealant, creating a double barrier. This combination is highly effective at preventing leaks, especially considering the vibrations and flex that RV roofs experience during travel. For more on this, check out How to Seal RV Roof Solar Penetrations. Always ensure the roof surface is meticulously cleaned and dry before application.
Best Practices and Advanced Tips for Long-Term Sealing
Achieving a watertight seal is one thing; maintaining it for years, even decades, is another. It requires adhering to best practices and implementing strategies for long-term durability.
Layering for Maximum Protection
The concept of "belt and suspenders" applies perfectly to roof waterproofing. Relying on a single line of defense is risky. Instead, think about creating multiple, redundant barriers against water intrusion.
A truly robust waterproofing strategy involves layers. First, you have the mechanical barrier of properly designed flashing or mounting hardware that physically covers and directs water away from the penetration point. This is often an integrated part of a solar panel mounting kit. Second, you add an initial sealant layer like butyl tape directly under the mounting foot or flashing. This sticky, compressible material fills minute voids and acts as a primary gasket. Finally, you apply a secondary, exterior sealant (like a self-leveling compound or a high-quality polyurethane sealant) over the top of the fastened hardware and flashing. This external layer provides UV protection, flexibility against thermal expansion, and a smooth surface for water runoff.
This multi-pronged approach ensures that if one layer were to fail or degrade over time, there are still other layers to prevent water from reaching your interior. It's an essential strategy for critical penetrations, especially those involving electrical wiring. Consider it a critical part of your Off-Grid Solar System Design Basics.
Creating a "Water Dam" Effect
Beyond simply sealing a hole, you want to actively guide water away from any potential entry points. This is where the "water dam" effect comes into play, especially on flat or low-slope roofs where water might sit for a period.
When applying exterior sealants, particularly around cable entry points or the bases of mounting feet, strategically shape the sealant to create a slight rise or ridge on the uphill side of the penetration. This subtle slope will divert water flow around the sealed area, rather than allowing it to pool directly against the seal. For instance, around a cable gland, you might apply a slightly thicker, sloped bead on the side facing the higher part of the roof.
For flat roofs, this means ensuring that sealant isn't just a flat covering, but has a slight dome or pitch to it. This facilitates runoff and prevents standing water from constantly testing the integrity of your seal. This technique, coupled with the right materials, minimizes prolonged exposure of the sealant to water, significantly extending its lifespan.
Regular Inspection and Proactive Maintenance
Even the best initial installation needs ongoing care. Your roof and solar system are constantly exposed to harsh elements, and seals can degrade over time.
Make it a habit to inspect your roof penetrations at least twice a year, ideally in spring and fall. Look for any signs of cracking, peeling, shrinking, or discoloration of the sealant. Pay attention to areas where the sealant meets the roof material or the mounting hardware – these are often the first places to show signs of failure. Also, check for any debris that might have accumulated around the penetrations, as this can trap moisture. Our Off-Grid Solar Maintenance Guide elaborates on this more.
If you spot any issues, address them immediately. Don't wait for a leak to appear inside your home. Often, a small touch-up with fresh sealant is all that's needed to prevent a major problem. Clean the old sealant thoroughly (remove loose bits, clean with appropriate solvent) before applying new. Being proactive about maintenance will save you significant time, money, and stress in the long run.
Troubleshooting and Maintenance for Your Waterproofed System
Even with the best intentions and meticulous installation, sometimes things go wrong. Knowing how to troubleshoot a leak and effectively repair it is a crucial skill for any off-grid homeowner.
Identifying and Locating Leaks
The first step in fixing a leak is finding its source. This can sometimes be more challenging than the repair itself, as water can travel a long way from the entry point before it becomes visible indoors.
When you notice a leak inside, start by looking directly above the visible water damage. However, keep in mind that water often travels along rafters, wires, or plumbing before dripping down. So, the actual entry point on the roof could be several feet away, usually uphill from where you see the stain. A good strategy is to use a systematic approach:
- Visual Inspection: Go up on the roof (safely!) and thoroughly inspect all potential penetration points – every solar panel mount, every cable entry, every vent, and even existing roof seams. Look for obvious cracks, gaps, or areas where sealant has lifted or deteriorated. Also, check for missing shingles or damaged flashing.
- Water Testing: If a visual inspection doesn't reveal the source, perform a targeted water test. Use a garden hose and start applying water to the lowest potential penetration point near the leak. Have someone inside monitoring. Gradually work your way uphill, isolating sections of the roof. When the leak appears inside, you've likely found the general area of the breach. This method allows you to pinpoint the exact failing seal.
- Thermal Imaging (Optional but Effective): For persistent or hidden leaks, a thermal imaging camera can be invaluable. It can detect differences in temperature caused by trapped moisture, revealing saturated areas within your roof structure or walls that are not yet visible to the naked eye. This can significantly reduce guesswork.
Repairing Compromised Seals
Once you’ve identified the source of the leak, it’s time for the repair. A proper repair isn’t just about globbing more sealant on top of old material; it requires careful preparation.
First, clean and prepare the surface thoroughly. Remove any loose, cracked, or deteriorated old sealant using a putty knife or scraper. If the old sealant is still strongly adhered but just needs a touch-up, clean it meticulously with isopropyl alcohol or mineral spirits to remove any dirt, oils, or residue that could prevent the new sealant from bonding. The goal is to create a clean, dry, and sound surface for the fresh material.
Next, re-apply the appropriate sealant. Use the same type of high-quality, UV-resistant sealant you used during the initial installation (or a compatible one if the original is unknown). Apply a generous bead, ensuring it bridges any gaps or cracks and forms a continuous, watertight barrier. For mounting feet, cover the bolt heads and surrounding area completely. For cable entries, ensure the new sealant integrates smoothly with the existing intact sealant, creating a cohesive seal. Don't forget the "water dam" principle if applicable, to encourage runoff. Allow the new sealant to cure fully according to the manufacturer's instructions, protecting it from rain if necessary.
Seasonal Checks and Preventative Measures
Preventing leaks is always easier than fixing them. Implementing a routine maintenance schedule will significantly prolong the life of your seals and system.
Beyond the twice-yearly visual inspections, consider seasonal preventative measures. In colder climates, heavy snow and ice can put tremendous stress on roof penetrations. After a heavy snowfall, safely remove excess snow to reduce weight and prevent ice dams, which can force water under flashing. In areas with high winds, regularly check that all mounting hardware is still tight and secure, as vibrations can gradually loosen fasteners and compromise seals.
Think about the lifespan of your materials. Most high-quality exterior sealants have a lifespan of 5-10 years, sometimes more. Keep a log of when your system was installed and when major sealants were applied. Even if they look okay, consider proactively re-sealing critical penetrations every 7-8 years to ensure continued protection. It's a small investment in time and material that can prevent thousands of dollars in damage. Maintaining your off-grid system effectively is key to ensuring its longevity and reliability, and proper waterproofing is a cornerstone of that.
| Sealant Type | Best Use Cases | Pros | Cons | Estimated Lifespan (Years) |
|---|---|---|---|---|
| Self-Leveling | RV roofs, flat roofs, horizontal seams | Fills gaps, flows evenly, good flexibility | Can be messy, not for vertical applications | 5-10 |
| Polyurethane | Metal roofs, shingle roofs, construction gaps | Strong adhesion, flexible, durable, paintable | Requires primer on some surfaces, slower cure time | 10-20 |
| Silicone | Various roofs, general sealing, high flexibility | Excellent UV resistance, very flexible | Can be difficult to paint, poor adhesion to some plastics | 10-20 |
| Butyl Tape | Under mounting feet, initial gasket for screws | Instant seal, highly pliable, long-lasting | Not for exposed application, needs compression | 20+ (when protected) |
| EPDM/TPO Specific | Rubber/TPO RV roofs, compatible with material | Formulated for specific roof types, flexible | May not work on other roof types, less common | 5-10 |
Disclaimer
The information provided in this guide is for general informational and educational purposes only. While we strive to offer accurate and helpful advice, off-grid solar installation, including waterproofing, can be complex and potentially dangerous. Always consult with qualified professionals, adhere to local building codes, and follow manufacturer instructions for all products and equipment used. Working on roofs and with electrical systems carries inherent risks, and proper safety precautions, including fall protection and electrical safety measures, must always be followed. We are not liable for any injury, damage, or loss resulting from the use or misuse of the information presented herein.