How to Build a Ground Mount for Panels
So, you're dreaming of an off-grid life, or perhaps just powering a remote cabin or workshop, and you're realizing that your roof might not be the ideal spot for solar panels. It's a common frustration, especially if you have an older roof, complex angles, or simply not enough space to capture all that beautiful sunshine. Building a ground mount system for your off-grid solar panels can be a game-changer, offering flexibility and efficiency that roof mounts often can't match. This comprehensive guide will walk you through the entire process, from planning to installation, helping you achieve reliable, independent power.
Why Choose a Ground Mount for Your Off-Grid Solar Panels?
It's easy to assume solar panels just go on the roof, right? That's what most people think when they consider solar. But for many off-grid enthusiasts, a ground mount offers distinct advantages that make it a superior choice. Don't get me wrong, roof mounts have their place, but they often come with limitations that can be incredibly frustrating when you're trying to maximize your energy independence.
Accessibility and Maintenance Advantages
One of the biggest headaches with roof-mounted solar panels is getting to them. Cleaning becomes a precarious balancing act on a ladder, and any troubleshooting or repairs suddenly require specialized safety gear and a strong nerve for heights. With a ground mount, all of that changes. You can walk right up to your panels, hose them down to remove pollen or dust, and easily inspect wiring or connections. This ease of access isn't just about convenience; it directly translates to better system performance and longevity. Regular cleaning can significantly improve efficiency, and quick maintenance means small issues don't escalate into costly problems. Imagine trying to tighten a loose wire on a steeply pitched roof versus doing it comfortably from the ground – it's a no-brainer for practical, long-term maintenance.
Optimal Sun Exposure and Adjustability
Roofs, by their very nature, are fixed structures with fixed orientations. If your cabin faces northeast, you're probably not going to get ideal sun exposure for your panels, and tilting them perfectly for winter sun collection becomes impossible. This is where ground mounts truly shine. You can choose the absolute best spot on your property, free from tree shading, other buildings, or geographical constraints. Furthermore, ground mounts allow for greater adjustability. You can set the tilt angle for optimal year-round sun harvesting, or even install seasonal or adjustable mounts to change the angle as the sun's path shifts throughout the year. For instance, in winter, when the sun is lower in the sky, you can adjust the panels to a steeper angle to catch more direct rays, significantly boosting your power production during those crucial shorter days. This ability to fine-tune your array's position means you can maximize your solar harvest, which is paramount when you're relying solely on the sun. This level of optimization is crucial when you're thinking about how to design for year-round off-grid power.
Site Flexibility Beyond Your Roof
Not every structure is suitable for a large solar array. Older barns might not handle the weight, or a tiny home might simply not have enough roof space for all the panels you need. Ground mounts free you from these structural limitations entirely. You can place your array in an open field, on a hillside, or even integrate it into a garden design. This flexibility is particularly valuable for larger off-grid systems, like those powering a full-time homestead, where a substantial number of panels are required. You're no longer restricted by the footprint of your building, allowing for much greater scalability. Plus, if you ever need to expand your system in the future, it's often much easier to add more panels to an existing ground mount array than to find additional roof space or reinforce existing structures. This versatility makes ground mounts a smart choice for long-term off-grid planning.
Planning Your Off-Grid Ground Mount Project
Before you start digging holes and assembling frames, a solid plan is your best friend. Skipping this crucial phase can lead to costly mistakes, wasted materials, and a system that underperforms. This isn't just about throwing panels in a sunny spot; it's about engineering a reliable power source for your off-grid dreams.
Assessing Your Site and Solar Needs
The very first step is to thoroughly evaluate your potential installation site. What's the sunniest spot on your property? How does the sun track across the sky throughout the day and across the seasons? Pay close attention to any shading from trees, hills, or other buildings, especially during winter months when the sun is lower. A simple shade analysis tool or even just observing the sun's path with a compass and a piece of paper can save you a lot of grief. You also need to consider the ground itself. Is it level? What's the soil type? Sandy soil might require deeper footings, while rocky terrain could make digging a challenge.
Equally important is understanding your energy needs. This involves a detailed load calculation: listing every appliance you plan to run, its wattage, and how many hours a day you'll use it. This will help you determine How much solar to run lights and electronics or even heavy-duty items like How much solar to run a well pump. Don't guess; calculate! This calculation directly informs How to size an off-grid solar system, including how many panels you'll need. Remember to factor in a few days of autonomy for cloudy weather. Without a clear picture of your energy consumption, you won't know how big your system needs to be. Many people underestimate their usage, leading to an undersized system and constant power anxieties.
Choosing the Right Materials and Design
Once you know your site and your power needs, it's time to think about the physical structure. Ground mount systems typically consist of a foundation, a support structure (the frame), and the panel mounting rails.
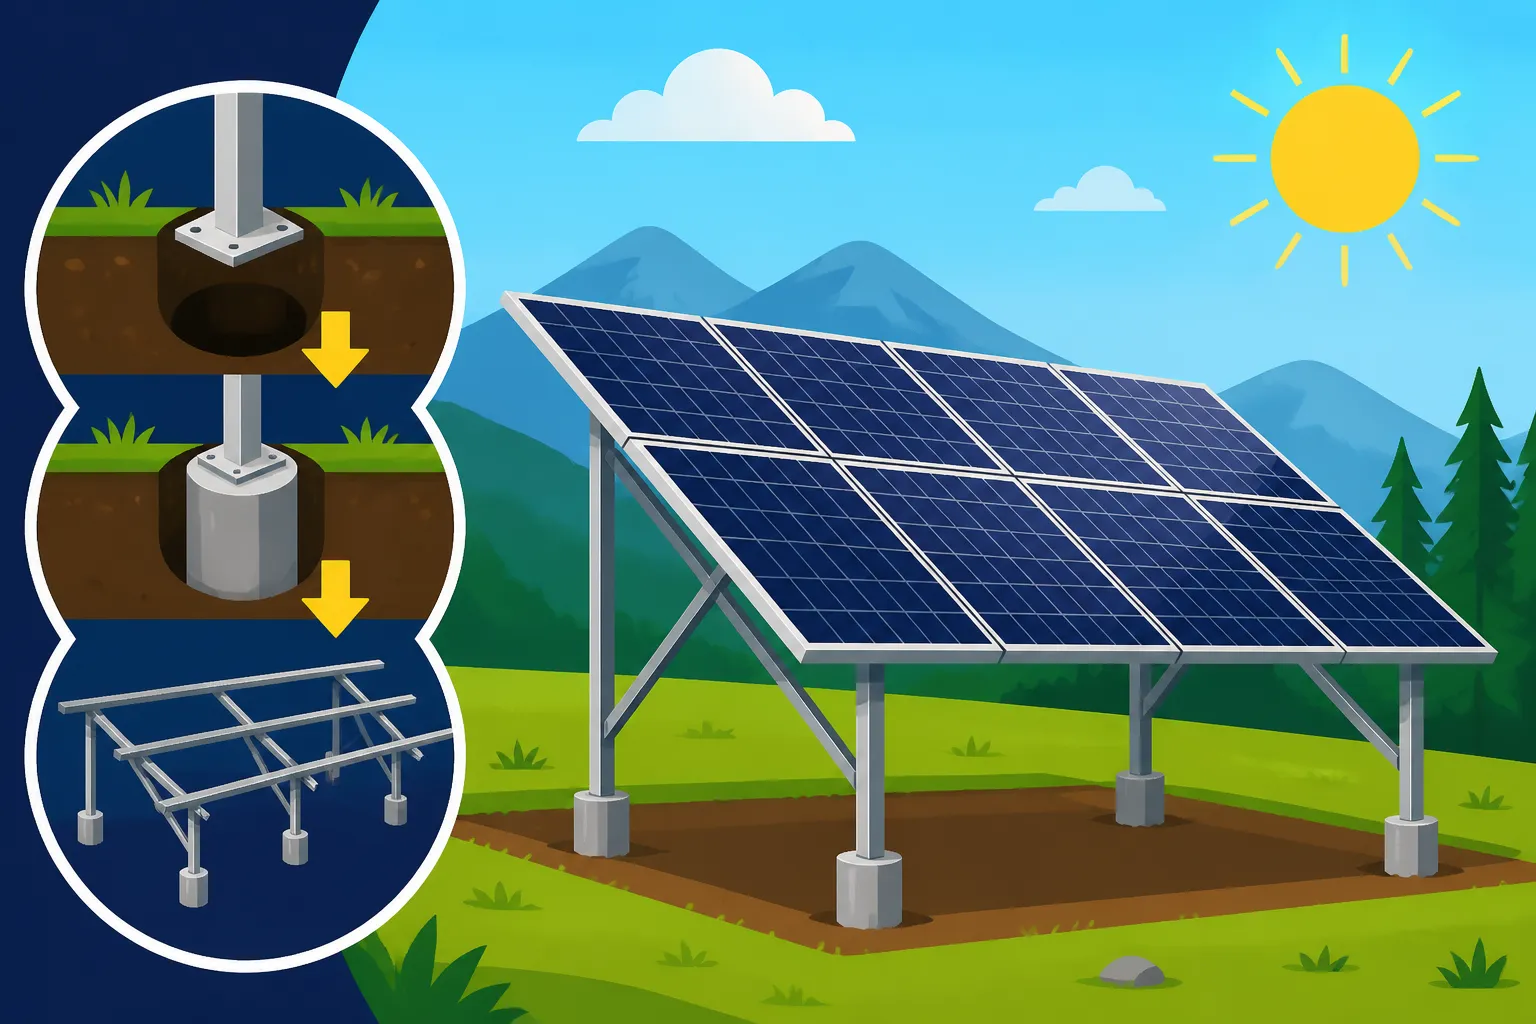
For foundations, options range from simple concrete piers and helical piles to earth anchors, depending on your soil and local climate (think frost heave). The goal is stability; these panels need to withstand strong winds, heavy snow loads, and seismic activity if you're in an active zone. For the frame itself, galvanized steel is a popular choice for its strength and corrosion resistance, while aluminum is lighter and also resistant to rust. Pressure-treated wood can be a more budget-friendly option for smaller arrays, but it requires careful selection to ensure longevity and structural integrity.
When it comes to the actual racking, many excellent systems are available from companies like IronRidge or Renogy. These kits often come with all the necessary rails, clamps, and hardware designed for specific panel sizes, making the assembly process much smoother. They've already done the engineering to ensure structural integrity and ease of installation. Deciding between a fixed-tilt system, where the panels are set at one angle, or an adjustable-tilt system, which allows you to change the angle seasonally, will also impact your design and material choices. Fixed systems are simpler and cheaper; adjustable ones offer greater energy harvest but with added complexity and cost.
Consider the layout too. Will your panels be in a single row, or multiple rows? If multiple rows, ensure enough spacing between them to prevent shading, especially during winter. A general rule of thumb is to have a distance equal to 1.5 to 2 times the height of the upper edge of the panel to the ground at its lowest angle.
Understanding Permits and Local Regulations
This is often the least exciting but most critical part of planning. Many off-grid dreamers mistakenly believe that because they're "off-grid," they don't need to worry about permits. This couldn't be further from the truth. Most jurisdictions, even in rural areas, have building codes and electrical codes that apply to solar installations. Failing to obtain the necessary permits can lead to fines, forced system removal, or difficulties when you try to sell your property down the line.
Start by contacting your local building department or county planning office. Ask about specific requirements for ground-mounted solar arrays. They'll likely need stamped engineering drawings for your structure, details on electrical wiring, and a site plan. You might also need to consider setback requirements from property lines or septic fields. Some areas may have specific wind load or snow load requirements that will influence your structural design. Even if you're doing a DIY installation, having plans reviewed by a professional engineer can ensure your system is safe and compliant. Don't be afraid to ask for help from local solar installers or electricians who are familiar with the area's regulations, as they often navigate these waters regularly. Understanding Off-Grid Solar Permits and Codes is paramount to avoiding future headaches.
Step-by-Step Guide to Building Your Ground Mount
Alright, with your plans in hand and all your materials gathered, it's time to get down to business! This part can feel daunting, but breaking it down into manageable steps makes it much more achievable. Remember, patience and precision are key to a safe and efficient system.
Foundation and Framing Construction
This is where the rubber meets the road, or rather, where your structure meets the earth. The foundation is the most critical part of your ground mount, as it needs to hold everything securely for decades.
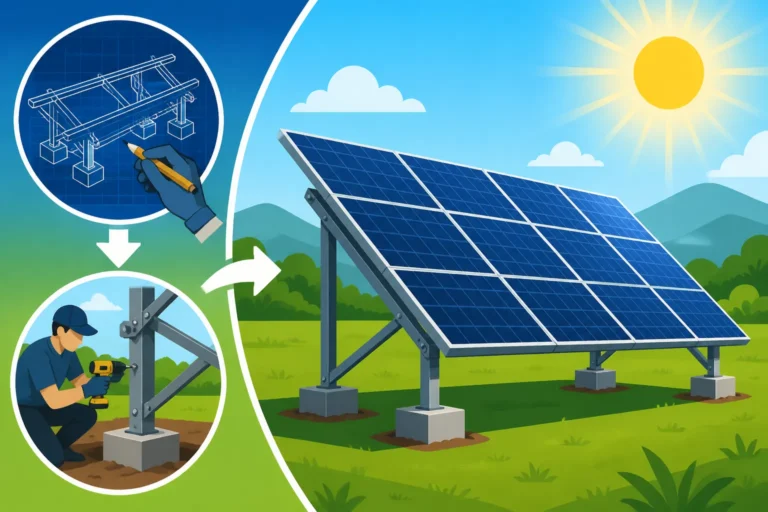
- Site Preparation and Layout: First, clear the area where your ground mount will sit. Remove any vegetation, rocks, or debris. Then, use stakes and string to accurately mark out the locations for your foundation posts. Double-check your measurements against your design plans. A slight error here can throw off your entire array alignment.
- Digging the Footings: Dig holes for your foundation posts according to your engineering specifications. For concrete piers, these holes need to be below the local frost line to prevent frost heave, which can literally push your structure out of the ground. The depth will vary greatly depending on your climate, but a quick search for "frost line map [your state]" can give you a general idea. The diameter of the holes will also be specified in your plans.
- Setting the Posts/Piers: If using concrete piers with rebar, place the rebar cages into the holes, ensuring they are properly spaced and aligned. Then, pour concrete, making sure the top is level. You can use Sonotubes or similar concrete forms to create clean, cylindrical piers above ground. If you're using steel posts, these are often set directly into concrete, or driven into the ground with specialized equipment, depending on your chosen method. For smaller systems or in less demanding conditions, heavy-duty ground screws or helical piles can be driven directly into the earth, saving on concrete work. If you're going the DIY route, a post-hole digger is your best friend.
- Building the Frame: Once your foundations are cured (allow concrete at least 72 hours, though a week is better for full strength), you can begin assembling the main support frame. This involves attaching horizontal beams and vertical supports to your foundation posts. Use high-quality, galvanized hardware for all connections to resist corrosion. Ensure everything is plumb, level, and square. Use a good quality carpenter's level and a speed square frequently. A sturdy frame is essential for long-term stability. Brands like Renogy and IronRidge offer excellent framing components that are designed to fit together easily. You can often find many of these structural components and fasteners on Amazon.
Panel Installation and Wiring Considerations
With the frame firmly in place, you're ready for the stars of the show: the solar panels themselves.
- Mounting Rails: Attach the panel mounting rails to your support frame. These rails are typically aluminum and are where the panels will physically sit. Ensure they are perfectly parallel and correctly spaced according to your panel dimensions.
- Placing and Clamping Panels: Carefully lift each solar panel onto the rails. It's best to have a helper for this, as panels can be bulky and surprisingly heavy. Secure them to the rails using the appropriate mid-clamps and end-clamps. These clamps typically fit into the channels of the rails and securely grip the panel frames. Ensure the clamps are tightened to the manufacturer's specifications – overtightening can damage the panel frame, while undertightening can allow panels to shift in high winds. You should definitely check out detailed information on How to Install Off-Grid Solar Panels to make sure you get this part right.
- Wiring the Array: This is where things get electrical, so safety first! Always cover your panels with a blanket or tarp during wiring to prevent them from producing electricity, or perform this step at dawn/dusk.
- Series vs. Parallel: Decide how you'll wire your panels – in series, parallel, or a combination (series-parallel). Wiring in series increases voltage, which is good for longer wire runs and higher system voltages (24V or 48V systems). Wiring in parallel increases amperage, which is good for lower system voltages (12V) or to match the input voltage requirements of your charge controller. This decision should have been made during your system design phase, considering your charge controller and battery bank. You can find more details on How to Wire Solar Panels in Series and How to Wire Solar Panels in Parallel for more in-depth guidance.
- MC4 Connectors: Solar panels typically come with MC4 connectors. These are weather-tight connectors designed for solar applications. Connect your panels together using these connectors and appropriate solar extension cables. Ensure all connections are tight and secure.
- Connecting to Combiner Box (Optional but Recommended): For larger arrays, it's wise to run the output from several series strings into a combiner box. This box houses fuses or breakers for each string, providing overcurrent protection and making troubleshooting easier. From the combiner box, a single set of positive and negative wires goes to your charge controller.
- Running Conduits: All wiring from the array to your charge controller needs to be protected, ideally in UV-rated electrical conduit. This protects the wires from physical damage, rodents, and UV degradation. Burying the conduit for underground runs is highly recommended for aesthetics and long-term protection. Remember to use appropriately sized wires to minimize voltage drop, especially over long distances. Check out How to Wire an Off-Grid Solar System for comprehensive details.
Securing and Grounding Your System
Safety isn't an afterthought; it's paramount. A properly grounded solar system protects you, your equipment, and your property from lightning strikes and electrical faults.
- Mechanical Grounding: All metallic components of your solar array – the panel frames, the mounting rails, and the support structure – must be bonded together and connected to an earth ground. Use grounding lugs and bare copper wire (typically #6 AWG or larger) to create a continuous ground path. Many panel manufacturers have specific grounding holes or points on their frames.
- Electrical Grounding: Your charge controller, inverter, and battery bank also need to be grounded. This is typically done by connecting a grounding wire from a designated terminal on each component to your main electrical grounding bus bar, which in turn is connected to the earth ground.
- Ground Rods: Drive one or more ground rods (typically 8-foot copper-clad steel rods) into the earth near your solar array and your main electrical panel. These rods provide the direct path for fault current or lightning to safely dissipate into the ground. Connect your grounding wires to these rods using approved ground rod clamps.
- Fuses and Breakers: Beyond grounding, install appropriate fuses and circuit breakers throughout your system. This includes inline fuses for individual solar panel strings, a DC disconnect switch between your solar array and charge controller, fuses between your charge controller and battery bank, and DC/AC breakers for your inverter. These devices protect your components from overcurrents and allow for safe system shutdown during maintenance or emergencies. Remember, when installing an off-grid solar system, safety and proper grounding are non-negotiable elements.
Common Challenges and Troubleshooting for Ground Mounts
Even the best-laid plans can encounter a snag or two. Building a ground mount, especially for off-grid living, means you're often dealing with varying terrain and weather. Knowing what challenges might arise and how to tackle them can save you a lot of stress down the line.
Dealing with Environmental Factors
Nature can be a powerful force, and your ground-mounted solar array needs to be ready for it.
- High Winds and Storms: Ground mounts, by design, are more exposed to wind than roof mounts. A poorly constructed or inadequately anchored ground mount can become a sail in a strong storm, potentially leading to catastrophic damage. This is why thorough foundation work and robust framing are non-negotiable. If you live in an area prone to hurricanes or strong winds (think coastal regions or open plains), you might need additional bracing, deeper footings, or more robust structural materials than someone in a sheltered valley. Checking local wind load requirements during the permitting phase is crucial. Regularly inspect your mounting hardware for any signs of loosening or corrosion, especially after severe weather.
- Snow Accumulation: While easier to access for snow removal than roof mounts, ground mounts in snowy climates still present challenges. Heavy, wet snow can put immense pressure on your panels and structure. If your panels are mounted at a low angle, snow can accumulate significantly, covering the panels for days or even weeks. This is another reason why adjustable tilt mounts are so valuable in snowy regions, allowing you to steepen the angle in winter to encourage snow to slide off naturally. When removing snow, use a soft broom or brush to avoid scratching the panel surface. Never use harsh chemicals or sharp objects. For areas with very heavy snowfall, consider building the ground mount high enough so that snow doesn't completely bury the lower edge of your panels.
- Pest and Vegetation Management: Ground-level panels can attract critters looking for shelter. Small animals might chew on wiring or build nests under the panels, potentially causing damage or fire hazards. Regular inspections are important. You might consider adding mesh or fencing around the base of your array to deter larger animals. Vegetation growth is another common issue. Weeds, grass, and even small shrubs can quickly grow up and shade the bottom rows of your panels, leading to significant power loss. A bit of regular landscaping, or even laying down gravel or a weed barrier under and around the array, can prevent this. Don't let a small patch of weeds steal precious kilowatt-hours from your off-grid power supply!
Ensuring Long-Term Stability and Durability
Building a ground mount is an investment that should last for decades. This means thinking about long-term durability from the very beginning.
- Corrosion Prevention: Your ground mount will be constantly exposed to the elements. Using galvanized steel, aluminum, and stainless steel hardware is key to preventing rust and corrosion. Even then, regular inspections are a good idea. In coastal areas with salt spray, or regions with high humidity, corrosion can accelerate. Consider adding protective coatings to vulnerable metal parts if your chosen materials aren't inherently corrosion-resistant. For wooden structures, ensure the wood is rated for ground contact and regularly apply protective stains or sealants.
- Foundation Settlement and Movement: Over time, foundations can settle, especially in areas with unstable soil or significant freeze-thaw cycles. This can cause your array to become unlevel or put undue stress on the frame. If you notice any significant tilting or shifting, it's crucial to address it promptly. This might involve re-leveling, adding additional supports, or even reinforcing the foundation. This is why digging below the frost line is so important; it significantly reduces the risk of frost heave and subsequent structural movement. When you consider the Lifetime Cost of an Off-Grid Solar System, factoring in the durability of your ground mount structure is vital.
- Wiring Integrity: While panels are generally very durable, the wiring is often the most vulnerable part of the system. UV exposure, temperature fluctuations, and animal interference can degrade cable insulation over time. Regularly inspect all exposed wiring for cracks, fraying, or chew marks. Ensure all conduits are sealed properly to prevent water ingress, which can lead to shorts or corrosion of internal wiring. Using high-quality, UV-resistant solar cables (typically specified as PV wire) is a must. Proper cable management, ensuring wires are neatly routed and secured, also reduces wear and tear and makes future troubleshooting much simpler. This attention to detail is part of the overall Off-Grid Solar Maintenance Guide.
| Ground Mount Type | Description | Pros | Cons | Ideal For |
|---|---|---|---|---|
| Fixed Tilt | Panels set at one optimal angle year-round. | Simplest, lowest cost, fewer moving parts. | Less efficient for seasonal changes, snow accumulation. | Stable climates, systems where max efficiency isn't critical. |
| Adjustable Tilt | Panels can be manually adjusted for seasonal sun angles. | Increased seasonal energy harvest, better snow shedding. | Higher initial cost, requires manual adjustment. | Snowy climates, optimizing year-round production, diligent owners. |
| Pole Mount | Panels mounted on a single, sturdy pole, often allowing 360-degree rotation. | Excellent for tracking sun, good for small arrays, minimal ground footprint. | Higher cost, can be more complex to install, heavy winds can be a factor. | Small systems, challenging terrain, maximum sun tracking. |
| Tracking System | Motorized system that automatically follows the sun's path. | Maximum energy harvest (25-45% more), optimal performance. | Very high cost, complex mechanics, more maintenance, prone to mechanical failure. | High energy needs, large budgets, specialized commercial applications. |
Disclaimer
The information provided in this guide is for general informational and educational purposes only and is not intended as professional advice. Off-grid solar system design and installation involve electrical work and structural engineering. Always consult with qualified professionals, local electricians, and relevant authorities to ensure your system is safe, compliant with all local codes and regulations, and appropriately sized for your specific needs. Working with electricity can be dangerous; always prioritize safety.