How to Install Solar on a Van
Hitting the road in your self-built camper van is the ultimate freedom, but nothing grinds that adventure to a halt faster than running out of power for your fridge, lights, or even just charging your phone. The struggle is real when you’re trying to balance the joy of off-grid exploration with the practicalities of modern living. This comprehensive guide is here to walk you through every step of installing a reliable solar system in your van, transforming it into a truly self-sufficient mobile home.
Understanding Your Van's Power Needs for Solar
Before you even think about buying a solar panel, the absolute first step is to understand what you actually need to power. Many van lifers jump straight to buying a 100W panel and a small battery, only to find themselves constantly running out of juice. It’s a common pitfall! Knowing your specific energy demands is the bedrock of a successful and frustration-free off-grid solar setup in your van. Without this crucial calculation, you're essentially guessing, and that can lead to an undersized (or oversized and expensive) system.
Calculating Daily Energy Consumption
This is the nitty-gritty part, but it's essential. Grab a pen and paper, or open a spreadsheet, and list every electrical item you plan to use in your van, along with how many hours per day you expect to use it. Don't forget the small stuff – charging your phone, running the water pump, even your fan for those warm nights. For each item, you'll need its wattage. You can usually find this on the appliance itself, in the user manual, or with a quick search online. If you only find amps and voltage, remember that Watts = Amps x Volts.
Once you have the wattage for each item, multiply it by the number of hours you'll use it daily. This gives you its daily watt-hour (Wh) consumption. Add all these up, and you'll have your total daily watt-hour requirement. For instance, if your tiny fridge uses 40W but only runs for about 12 hours a day (since it cycles on and off), that's 480 Wh. Your laptop might draw 60W for 3 hours, adding another 180 Wh. This detailed accounting is the only way to accurately determine how much solar generation and battery storage you'll need. Don't gloss over this step; it truly dictates the rest of your system design. If you want a deeper dive into this, check out our guide on how to calculate daily energy usage.
Choosing the Right System Voltage
The majority of smaller van builds start with a 12-volt (12V) system, and for good reason. Most automotive accessories and many common RV appliances are designed to run on 12V DC power. This makes wiring simpler and reduces the need for extensive DC-DC converters. However, as your power needs grow, or if you're planning to run higher-wattage appliances like a powerful blender, microwave, or even a small air conditioner, a 24-volt (24V) or even a 48-volt (48V) system becomes significantly more efficient.
Higher voltage systems mean lower current (amperage) for the same amount of power (watts). Lower current allows you to use thinner wires, which can save on cost and reduce voltage drop over longer distances – a big plus in a larger van or when wiring multiple components. For example, if you're trying to figure out how many batteries for an off-grid system, going 24V or 48V means you'll still need the same total energy capacity (Wh), but fewer batteries wired in parallel, or more in series, simplifying balancing and reducing cable losses. Deciding on your system voltage early on is critical, as it impacts everything from your inverter choice to your charge controller and battery bank configuration. Our article on 12V vs 24V vs 48V: Which to Choose offers more insights into this decision.
Here's a quick comparison of common van applications and suggested voltages:
| Application Type | Typical Voltage (DC) | Pros | Cons |
|---|---|---|---|
| Small setups (lights, phone) | 12V | Simple, common components, easy to expand slowly | Less efficient for high loads, larger wire needed |
| Mid-range (fridge, laptop) | 12V or 24V | 12V is still common, 24V more efficient for higher loads | 24V requires careful component selection |
| Larger builds (AC, microwave) | 24V or 48V | Significantly more efficient, smaller wire, less heat | Fewer readily available 24V/48V appliances, more complex |
Gathering the Essential Components for Your Van Solar System
Once you've done the hard work of calculating your energy needs and chosen your system voltage, it's time for the fun part: selecting the actual equipment! This is where many people get a bit overwhelmed because there are so many brands and options out there. But fear not, we're breaking it down into the core components you absolutely need for a robust and reliable van solar system. Thinking about your budget here is key, but remember, investing in quality now can save you headaches and costly replacements down the line.
Selecting Solar Panels for Van Roofs
The solar panels are your energy collectors, the heart of your generation system. For vans, you typically have a few choices: rigid panels, flexible panels, and sometimes even portable setups. Rigid panels are generally the most efficient and durable. They come in aluminum frames and are built to withstand the elements for decades. Brands like Renogy offer excellent rigid panels that are often a favorite among van builders for their reliability and performance. They are usually mounted with brackets, creating a small air gap that helps with cooling, which in turn boosts efficiency.
Flexible panels, on the other hand, are lightweight and can conform to curved surfaces, making them popular for stealth builds or vans with limited flat roof space. While they offer aesthetic advantages, they often have lower efficiency and a shorter lifespan compared to rigid panels, especially if not installed with proper airflow to prevent overheating. Whichever type you choose, ensure the wattage rating aligns with your calculated daily energy needs. Remember that actual output will vary based on sun exposure, temperature, and shading. For more guidance, our article on the best off-grid solar panels delves into different types and their suitability.
Inverters and Charge Controllers
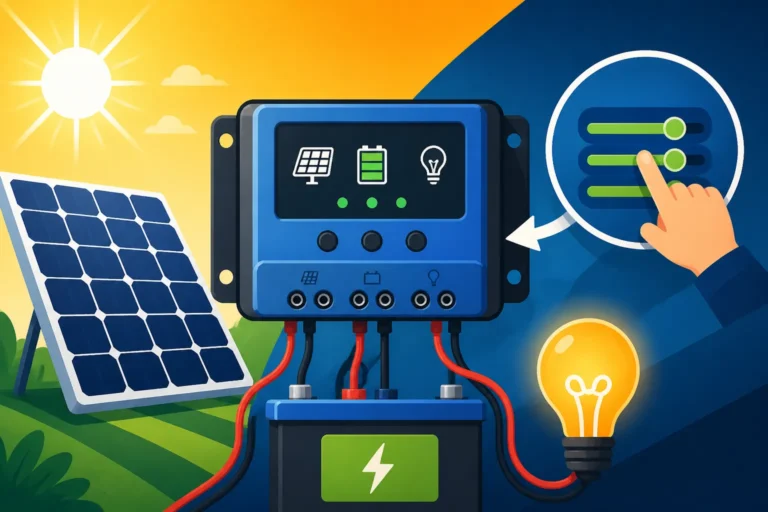
These two components are the brains and brawn of your electrical system. A charge controller is essential to regulate the power coming from your solar panels to your battery bank. It prevents overcharging, which can severely damage your batteries, and optimizes the charging process. There are two main types: PWM (Pulse Width Modulation) and MPPT (Maximum Power Point Tracking). For a van setup, especially if you're serious about efficiency and getting the most out of your panels, an MPPT charge controller is almost always the better choice. It's more efficient, especially in varying light conditions, which you'll often encounter on the road.
The inverter is what converts the DC (Direct Current) power from your batteries into AC (Alternating Current) power, which is what most of your household appliances use (think outlets in your home). You'll need a pure sine wave inverter, as modified sine wave inverters can damage sensitive electronics and aren't suitable for many appliances. The size of your inverter (rated in watts) needs to be able to handle the surge power of all the AC appliances you plan to run simultaneously. If you plan to run a high-draw item like a microwave, ensure your inverter's surge rating can handle its initial power spike. To learn more about selecting the right size, check out our guide on how to size an off-grid inverter.
Battery Bank Considerations
Your battery bank is your energy storage. Without it, you'd only have power when the sun is shining directly on your panels. For van life, the choice typically comes down to lead-acid (often AGM) or lithium iron phosphate (LiFePO4) batteries. AGM batteries are a more budget-friendly entry point, but they are heavy, have a limited number of charge cycles, and should only be discharged to about 50% of their capacity to prolong their life.
LiFePO4 batteries, while a higher upfront cost, are a game-changer for van applications. They are significantly lighter, can be discharged almost completely without damage, have a much longer lifespan (thousands of cycles), and charge more efficiently. This means you need less actual capacity compared to AGM to get the same usable energy. Many van builders swear by brands like Battle Born or Renogy for their robust LiFePO4 batteries, often finding them on platforms like Amazon. Our article on the best off-grid solar batteries provides a detailed comparison to help you make this important decision. Remember, accurately calculating how much battery capacity you need is just as important as your solar array size.
Mounting Solar Panels Securely on Your Van Roof
Now that you have all your shiny new components, it’s time to get hands-on and attach those panels to your van. This step is critical because you want your panels to be secure, efficient, and weatherproof. Drilling holes in your van roof can be a little nerve-wracking, but with careful planning and the right techniques, you can ensure a professional and watertight installation. Rushing this stage is a recipe for leaks or, worse, losing a panel on the highway.
Preparing the Roof and Panel Placement
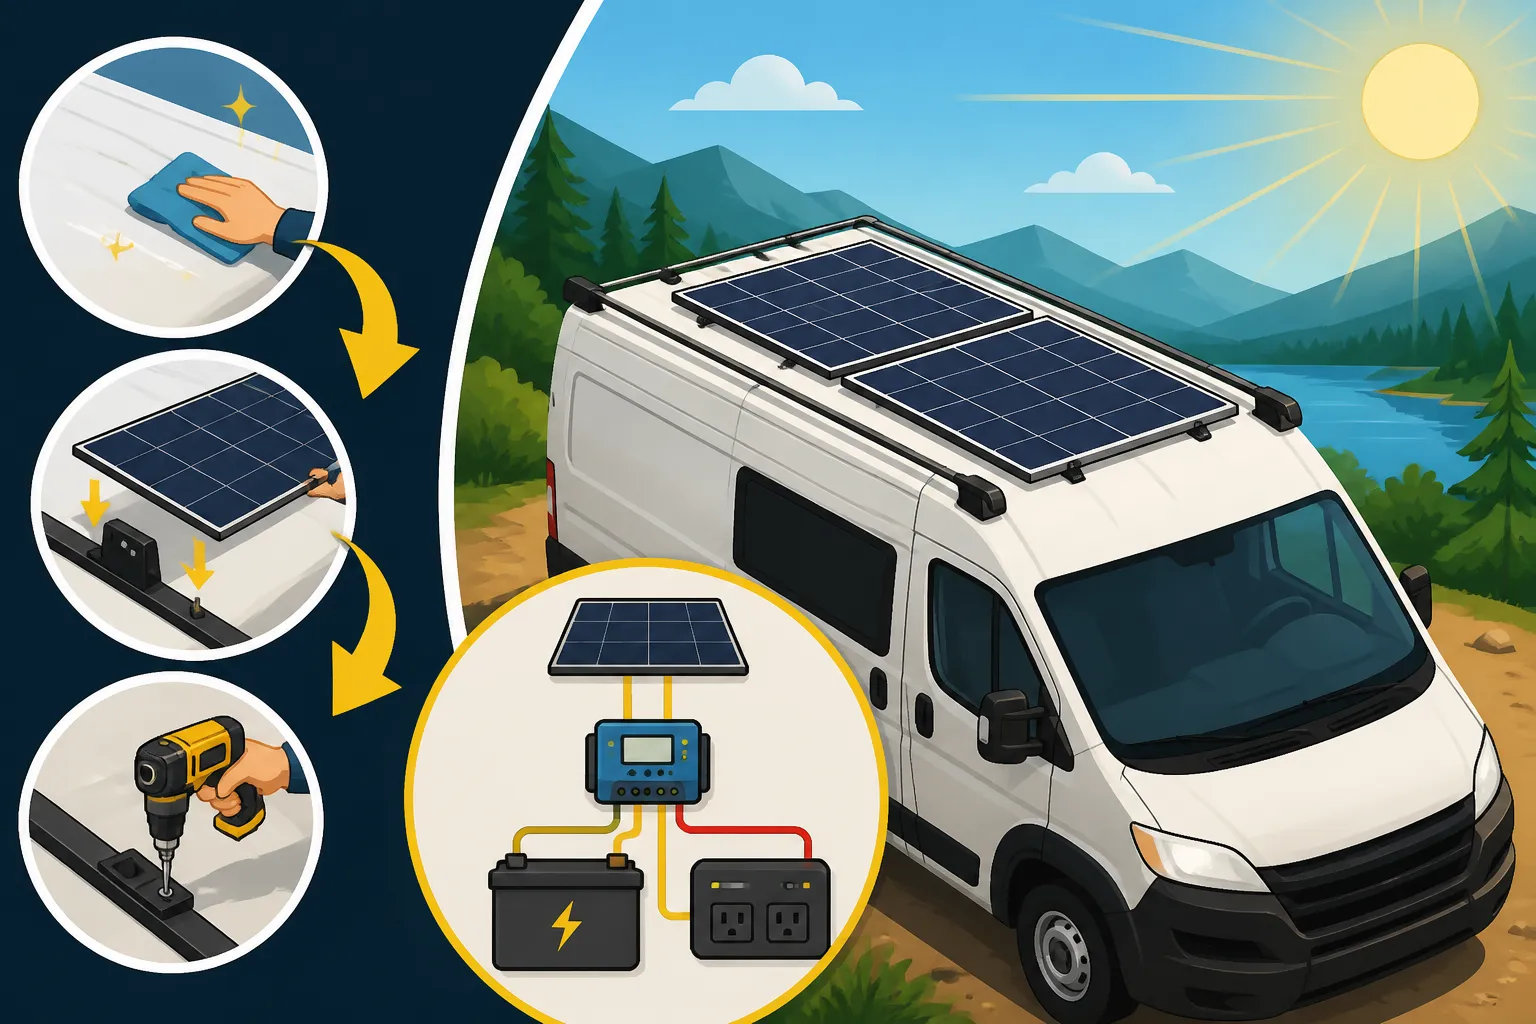
Before you start drilling, take some time to thoroughly clean your van's roof. Remove any dirt, grime, or old adhesive residue. A clean surface is essential for good adhesion with sealants. Next, map out your panel placement. Consider factors like available flat space, potential shading from roof vents or awnings, and future additions like a roof rack or a fan. You'll want to optimize for maximum sun exposure, typically facing south if stationary, but for a mobile van, minimizing shading throughout the day is key.
Also, think about how the wiring will run from the panels into your van. Try to position your panels so that the wiring can be routed cleanly and minimally, ideally near a roof gland or a vent you already plan to install. Proper spacing between panels is also important, not just for airflow to prevent overheating (which reduces efficiency), but also for ease of cleaning and maintenance. Don't be afraid to use painter's tape to mark out your panel footprint and mounting points before committing to any holes. This allows you to visualize and adjust without any permanent marks.
Drilling, Sealing, and Mounting Techniques
Once you've finalized your panel placement, it's time to mark your mounting points. Most rigid solar panels come with pre-drilled holes in their frames, which you'll use with specialized solar panel mounting brackets. These brackets are usually made of aluminum and designed to elevate the panels slightly off the roof. After marking, drill pilot holes. This is the moment where many DIYers get anxious, but a good quality drill bit and a steady hand are all you need.
After drilling, the most critical step for preventing leaks is proper sealing. Apply a generous amount of high-quality, marine-grade sealant (like Sikaflex 221 or 3M 5200) around and into each drilled hole before inserting your mounting screws. Also, apply sealant over the screw heads once they're tightened down. For running the solar cables into the van, a waterproof cable entry gland is absolutely essential. These glands create a watertight seal around your wires as they pass through the roof. Again, use plenty of sealant around the base of the gland where it meets the van roof. For flexible panels, high-bond VHB tape combined with a robust sealant around the edges is usually the go-to method, ensuring the entire panel perimeter is sealed against moisture intrusion. Always double-check your seals before moving on to the wiring.
Wiring Your Van's Solar System for Safety and Efficiency
With your panels securely mounted, the next phase is connecting all the electrical components. This is arguably the most intimidating part for many beginners, but with a clear understanding of the flow and proper safety measures, it's entirely manageable. Incorrect wiring can lead to poor performance, damage to components, or even fire hazards, so taking your time and following best practices is paramount. Remember, electricity doesn't mess around! To learn more about overall best practices, you can check out our comprehensive guide on how to wire an off-grid solar system.
Connecting Panels to the Charge Controller
The wiring sequence for your solar system is important: panels to charge controller, charge controller to batteries, batteries to inverter and DC loads. First, let's talk about the solar panels. Your panels will typically have MC4 connectors, which are weatherproof and easy to connect. Depending on your system voltage and panel specifications, you'll either wire your panels in series, parallel, or a combination of both. Wiring in series increases voltage, while wiring in parallel increases current (amperage). For example, if you have two 12V panels and want a 24V system, you'd wire them in series. Our guide on How to Wire Solar Panels in Series vs Parallel provides an in-depth explanation.
From the panels, the positive and negative wires will run through your cable entry gland and connect directly to the "PV Input" or "Solar" terminals on your charge controller. Ensure you observe polarity (positive to positive, negative to negative) meticulously. It’s also wise to include an inline fuse or a DC circuit breaker between your solar panels and the charge controller, especially for larger arrays. This protects your system from potential short circuits or overcurrent situations stemming from the panels.
Wiring the Battery Bank and Inverter
Next up is connecting your charge controller to your battery bank. Again, strict adherence to polarity is crucial here. The "Battery" terminals on your charge controller will connect directly to your battery bank. For safety and compliance with electrical codes, it's absolutely non-negotiable to install a properly sized fuse or circuit breaker as close as possible to the positive terminal of your battery bank. This protects the entire system from potential battery short circuits. For example, if you're installing a robust Renogy system, their manuals will specify the recommended fuse sizes for each component.
Finally, the inverter connects to your battery bank. Use thick, high-gauge cables for this connection, as the inverter will draw significant current. Just like with the charge controller, a major fuse or circuit breaker must be installed on the positive line between the battery and the inverter. This fuse is typically much larger than others in your system because the inverter can draw a substantial amount of power. Always double-check that your cables are rated for the current they will carry to prevent overheating and fire risks. For more detailed instructions on this crucial connection, our guide on how to connect an inverter to batteries is a great resource.
Integrating a DC Fuse Block and AC Breaker Panel
Beyond the core components, you'll want a safe and organized way to distribute power to your appliances. For your 12V (or 24V) DC appliances, a DC fuse block is indispensable. This allows you to run individual fused circuits to each of your DC loads, such as LED lights, USB charging ports, your water pump, or a fridge. Each circuit should have a fuse sized appropriately for the appliance it powers and the wire gauge used. This way, if one appliance shorts, only its fuse blows, protecting the rest of your system.
For your AC appliances that run off the inverter, you'll need a small AC breaker panel, similar to a mini version of what you'd find in a house. The AC output from your inverter will feed into this panel, and then individual circuits with appropriate circuit breakers will run to your AC outlets throughout the van. This ensures that any overload or short circuit on an AC appliance will trip a breaker, safeguarding your inverter and overall electrical system. Properly grounding both your DC and AC systems to the van's chassis is also a critical safety step that should not be overlooked.
Testing and Optimizing Your Van Solar Setup
You've put in the hard work: calculated your needs, purchased your components, mounted the panels, and wired everything up. Now comes the moment of truth – testing your system! This phase is just as important as the installation itself. It ensures everything is working as it should, identifies any potential issues, and helps you learn how to get the most out of your new off-grid power plant. Don't skip these steps; a thorough test will give you peace of mind and prevent unexpected power outages down the road.
Initial System Checks and Troubleshooting
Before you flip any switches, do a thorough visual inspection of all your connections. Are all wires securely fastened? Is polarity correct everywhere? Are all fuses and breakers installed? Once you're confident, connect your battery bank first, then your solar panels. Your charge controller should light up, indicating it's receiving power from both sources. Most modern charge controllers will have a display or indicators showing battery voltage, solar input voltage, and charging current.
Start by testing your DC loads one by one. Turn on a light, plug in your phone to a USB port, and check your fridge. If everything works as expected, move on to the AC side. Turn on your inverter and test an AC outlet with a small appliance, like a phone charger. Gradually introduce higher-draw appliances, checking the inverter's display or your battery monitor to ensure it can handle the load without immediately draining your batteries or faulting. If you encounter any issues, most charge controllers and inverters have diagnostic codes. Consult their manuals immediately. Common issues include reversed polarity (a big no-no!), loose connections, or improperly sized fuses. Sometimes the fix is as simple as re-seating a wire.
Maximizing Performance and Longevity
Once your system is up and running smoothly, the goal shifts to optimizing its performance and extending its lifespan. One of the biggest factors in maximizing solar production is panel cleanliness. Dust, dirt, pollen, and even bird droppings can significantly reduce your panels' efficiency. Make it a habit to periodically clean your panels with water and a soft brush or cloth. For those seeking to further enhance their off-grid setup, a portable solar generator could be a useful addition for backup.
Regularly monitor your battery voltage and charge cycles, especially if you have lead-acid batteries. Avoid consistently deep discharging them. For LiFePO4 batteries, while they tolerate deep discharges much better, maintaining them within their recommended operating parameters will still prolong their life. Keep an eye on all electrical connections, especially those that might be exposed to vibration from driving; periodically check for any loose wires. Finally, understand your system's limitations. Don't try to run a high-wattage hair dryer and a microwave at the same time if your inverter isn't sized for it. By being mindful of your power consumption and performing basic maintenance, your van's solar system will serve you reliably for countless adventures. For a complete overview of keeping your system in top shape, refer to our comprehensive off-grid solar maintenance guide.
Disclaimer
The information provided in this guide is for general informational purposes only and does not constitute professional electrical advice. Working with electricity can be dangerous. Always consult with a qualified electrician or solar professional before undertaking any electrical installation. Ensure all work complies with local and national electrical codes and regulations. The author and publisher are not responsible for any damage, injury, or loss resulting from the use or misuse of this information. Proceed at your own risk.