How to Wire LiFePO4 Batteries in Series
It can be incredibly daunting to look at a bank of batteries and wonder how on earth you connect them safely and correctly to get the power you need, especially when you're dealing with advanced LiFePO4 technology. Many folks want to increase their system's voltage for more efficient power transfer or to meet inverter requirements, but the thought of frying expensive batteries due to a wiring mishap is a real fear. This comprehensive guide is here to walk you through exactly how to wire LiFePO4 batteries in series, ensuring you do it safely and effectively.
Understanding Series Wiring for LiFePO4 Batteries
When you're diving into off-grid solar, batteries are the heart of your system, and how you connect them directly impacts their performance and your overall power capacity. Wiring batteries in series isn't just about plugging things in; it's about building a robust and reliable power source for your homestead or mobile setup.
Why Series Wiring Matters
Series wiring is all about increasing the voltage of your battery bank. Imagine you have several 12-volt LiFePO4 batteries. If you connect them in series, their voltages add up. So, two 12V batteries in series become a 24V bank, three become 36V, and four become a powerful 48V system. Why would you want higher voltage? Well, for starters, higher voltage systems are often more efficient. They allow you to use thinner wires to carry the same amount of power (watts) over longer distances, reducing voltage drop and material costs. This is particularly crucial for larger off-grid homes or setups where long cable runs from the battery bank to the inverter are unavoidable.
Furthermore, many powerful inverters and charge controllers are designed for higher voltage systems, like 24V or 48V. If your primary inverter requires 48V, a series connection is the only way to achieve that with standard 12V batteries. It's not about getting more energy in total, but about changing the form of that energy (voltage) to better suit your appliances and system components. Think of it like turning several small streams into one powerful river – the total water volume might be the same, but its force is concentrated.
Key Components You Will Need
Before you even think about touching wires, let's gather up all the necessary components. Having everything on hand makes the process smoother and safer. You don't want to be halfway through a connection and realize you're missing a critical piece.
First and foremost, you'll need your LiFePO4 batteries. Make sure they are of the same voltage, capacity (Amp-hours), and ideally, from the same manufacturer and production batch. Mixing and matching can lead to imbalance issues down the road, which can shorten the lifespan of your battery bank. For example, if you're building a 24V system, you'll need two 12V batteries. If you're going for a 48V setup, you'll need four 12V batteries.
Next, you'll need high-quality battery cables. These are not your average speaker wires; they need to be thick enough to handle the current flowing through them without overheating. When you're learning how to size wire and cables for your off-grid system, remember that gauge is critical. For series connections, the current remains the same as a single battery, but the total voltage increases. Still, it's wise to oversize slightly for safety and efficiency. You can often find excellent battery cables pre-made with lugs on Amazon or at specialty RV and marine supply stores. You'll need enough cables to connect each battery in series and then to connect the entire bank to your charge controller and inverter.
Lastly, you'll need some essential tools and safety gear. This includes a multimeter (absolutely non-negotiable for checking voltage and continuity), a wrench or socket set for tightening battery terminals, a wire brush for cleaning terminals (if they aren't brand new), and personal protective equipment like insulated gloves and eye protection. Trust me, a little preparation goes a long way in preventing accidental short circuits or injuries.
Step-by-Step Guide to Wiring LiFePO4 Batteries in Series
Now that you have your components, let's get down to the actual wiring. Taking your time and following these steps diligently will ensure a safe and successful installation.
Safety First: Preparations Before You Begin
Before you even think about connecting wires, safety needs to be your absolute priority. You're working with significant amounts of stored energy, and mistakes can be dangerous, leading to fires, damage to equipment, or serious injury.
First, always wear insulated gloves and eye protection. Batteries, especially LiFePO4, can deliver massive currents if short-circuited. A dropped wrench across terminals could weld itself and cause an explosive spark. Second, ensure all loads are disconnected from your battery bank. This means turning off your inverter, charge controller, and any other devices that draw power from or supply power to the batteries. Essentially, you want the batteries completely isolated.
Third, ensure your workspace is dry, well-ventilated, and free from any flammable materials. While LiFePO4 batteries are much safer than older lead-acid types, accidents can still happen. Have a fire extinguisher rated for electrical fires (Class C or ABC) readily available, just in case. Finally, visually inspect all your batteries for any signs of damage, leaks, or corrosion before you begin. Never attempt to wire a damaged battery into your system. Taking these preparatory steps is not just good practice; it's vital for your well-being and the longevity of your off-grid setup.
The Wiring Process Explained
Wiring batteries in series is conceptually straightforward, but attention to detail is key. Let's break it down.
-
Arrange Your Batteries: Place your batteries in a stable, well-ventilated location. Leave enough space between them for airflow and easy access to the terminals. For example, if you're wiring four 12V batteries to make a 48V bank for your cabin's solar system, arrange them side-by-side or stacked securely.
-
Connect Negative to Positive (and so on): This is the core of series wiring.
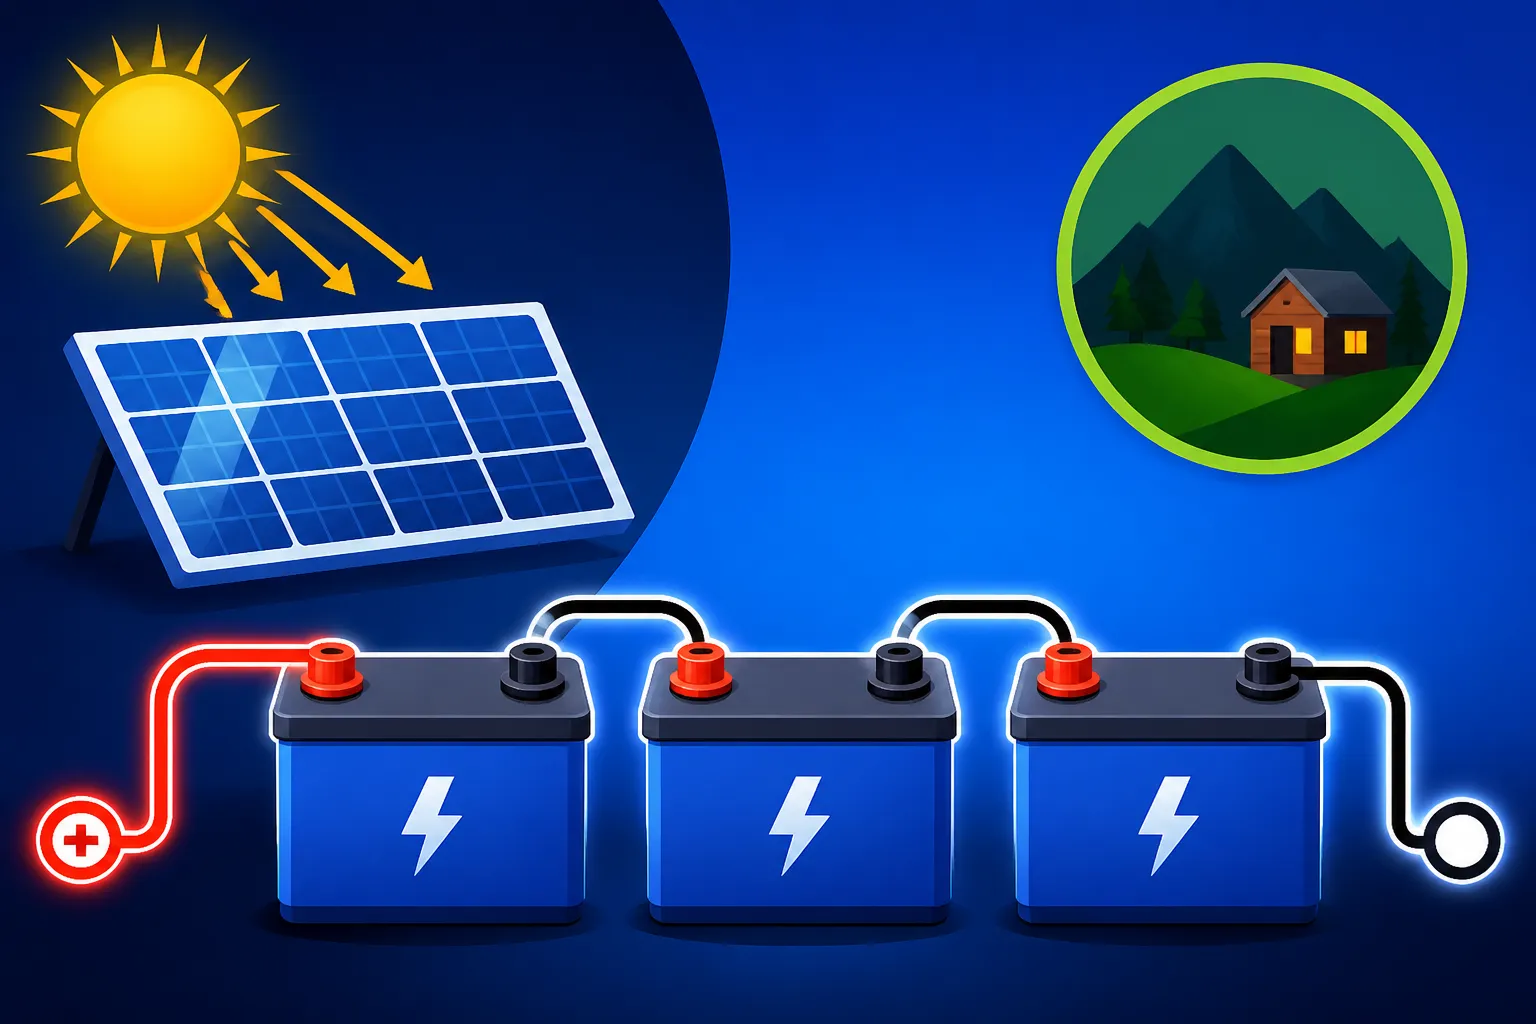
- Take the negative terminal of the first battery and connect it to the positive terminal of the second battery using one of your thick battery cables.
- If you have a third battery, connect the negative terminal of the second battery to the positive terminal of the third battery.
- Continue this pattern for all batteries in your series string.
- Tighten all connections firmly with your wrench, ensuring there's no wiggle. Loose connections can generate heat and reduce efficiency, acting like tiny resistors in your system.
Imagine a chain where each link adds to the total length. In this case, each battery adds to the total voltage. When you're done, you'll have one "free" positive terminal at one end of your battery string and one "free" negative terminal at the other. These are your main output terminals for the entire series bank.
-
Verify Voltage with a Multimeter: Before connecting anything else, grab your multimeter. Set it to measure DC voltage. Place the positive probe on the free positive terminal of your series string and the negative probe on the free negative terminal. The reading should be the sum of all individual battery voltages. For instance, two 12V batteries should read around 24V, and four should read around 48V. If you get a reading that's wildly off (like 12V or 0V), immediately recheck your connections. A common mistake is connecting positive-to-positive or negative-to-negative by accident. This verification step is crucial and will save you headaches down the line. It's a fundamental part of learning how to wire an off-grid solar system correctly.
-
Connect to Your System: Once you've confirmed the correct voltage, you can connect these main output terminals to your charge controller's battery input terminals. Ensure you connect positive to positive and negative to negative, respecting the polarity. From the charge controller, the power then flows to your inverter and ultimately to your loads. For detailed guidance, check out our article on How to Connect Batteries, Inverter, and Panels.
Initial Charge and Balancing
LiFePO4 batteries are fantastic, but they do have one critical characteristic when wired in series: they need to be balanced. Individual cells within a battery, and individual batteries within a series bank, can have slightly different states of charge or internal resistances. Over time, these small differences can lead to one battery becoming overcharged or over-discharged, which dramatically reduces the lifespan of the entire bank.
Ideally, before you wire them in series, each battery should be individually charged to full capacity and then allowed to rest for a few hours. This gives their internal Battery Management System (BMS) time to balance the cells within each battery. For a truly robust system, you might even consider actively balancing them with an external balancer if your individual batteries don't have strong internal BMS balancing capabilities, especially if you're building a large system for year-round living. Many premium LiFePO4 batteries, like those from Renogy, often come with robust internal BMS systems designed to handle balancing, but it’s still good practice to start with a balanced state.
After wiring in series, when your off-grid solar system starts operating, the charge controller will charge the entire bank. A good LiFePO4 battery's internal BMS will continue to balance the cells. However, periodically (perhaps once every few months), it's a good idea to bring your entire battery bank to a full charge and hold it there for a few hours to allow the BMS to do its work effectively. This helps maintain the health and longevity of your investment. You can learn more about this in our guide on How to Maintain an Off-Grid Battery Bank.
Common Pitfalls and Troubleshooting When Wiring in Series
Even with the best intentions, things can sometimes go awry. Understanding common mistakes and how to address them can save you a lot of frustration and potential damage.
Avoiding Voltage Imbalance Issues
Voltage imbalance is perhaps the biggest boogeyman for series-wired LiFePO4 batteries. It occurs when one battery in the series string consistently has a lower or higher voltage than the others, leading to premature failure of the weakest link. This often stems from starting with batteries that weren't fully charged and balanced, or from using batteries of different ages, capacities, or manufacturers.
To avoid this, as mentioned, always start with individually charged and balanced batteries. If you notice one battery in your series bank is consistently showing a different voltage with your battery monitor, it's a red flag. You might need to temporarily disconnect that battery, fully charge and balance it individually, and then reintegrate it. In some cases, if the imbalance is severe and persistent, it could indicate a faulty battery or a weak internal BMS. For larger setups, investing in an external active balancer can be a game-changer, continuously monitoring and shifting charge between batteries to keep them perfectly aligned. Remember, your battery bank is only as strong as its weakest cell, and preventing imbalance is key to maximizing its lifespan.
Proper Cable Sizing and Connections
Undersized cables are a common mistake that can lead to significant problems. If your cables are too thin for the current they're carrying, they will heat up, which wastes energy, reduces efficiency, and poses a fire hazard. While series wiring keeps the current the same as a single battery, the cables connecting the entire bank to your inverter and charge controller need to be sized for the maximum current your inverter can draw. A high-quality inverter like a Victron MultiPlus or a Sol-Ark system can pull substantial current under heavy loads.
Loose connections are another culprit. A connection that isn't tight will create resistance, leading to heat generation and voltage drop, just like undersized cables. Over time, this can degrade the terminals and even melt the cable insulation. Always use the correct tools to tighten connections, ensuring they are snug but not overtightened to avoid stripping threads. Periodically check all your connections, especially after the system has been running for a while, as vibrations or temperature changes can sometimes loosen them. Good quality battery cables, often with pre-crimped lugs, can be found on platforms like Amazon or from specialized solar suppliers, making this part of the setup much easier. Pay attention to our guide on How to Size Wire and Cables to ensure you get it right.
Verifying Your Setup
Once everything is wired and tightened, and you've checked the overall voltage, it's time for a more thorough verification. Don't just flip the switch and hope for the best!
First, with your multimeter, recheck the voltage of the entire series bank at the main terminals. Does it match your expected voltage (e.g., 24V or 48V)? Next, if your batteries have individual voltage monitoring ports or a Bluetooth-enabled BMS, check the voltage of each individual battery. They should all be very close in voltage, especially after being balanced.
Then, connect your charge controller to the battery bank, but keep your inverter and loads off for now. Observe the charge controller. Does it correctly identify the battery voltage? Does it show a charge if your solar panels are producing power? Look for any error codes or unusual readings. If everything looks good, you can then connect your inverter to the battery bank. Start with small loads first, gradually increasing them to ensure the system is stable and handles the load gracefully. Listen for any strange noises, smell for anything burning, and feel connections for excessive heat. Taking these methodical steps to verify your setup will help catch any potential issues before they become major problems.
Series vs. Parallel Wiring: Making the Right Choice
Deciding whether to wire your batteries in series or parallel (or both!) is a fundamental design choice for any off-grid solar system. Each configuration serves a different purpose, and understanding the nuances is crucial for optimizing your power setup.
When to Choose Series Wiring
You should opt for series wiring primarily when you need to increase the voltage of your battery bank. As we've discussed, this is essential if your inverter or charge controller operates at a higher voltage (e.g., 24V or 48V). Many modern, efficient inverters perform better at higher voltages because they reduce current, which in turn reduces energy losses over distances and allows for thinner, less expensive cabling from the battery bank to the inverter itself.
For example, if you have a powerful 5000W inverter for a whole house off-grid solar setup, it's very likely a 48V unit. Trying to run that on a 12V battery bank would require an immense amount of current, leading to huge, unwieldy cables and significant efficiency losses. Series wiring is also beneficial when your solar array itself generates higher voltage. Matching your battery bank voltage to your solar array's voltage (after the charge controller) can simplify system design and optimize performance. If your goal is to build a robust system for a cabin, tiny home, or full-sized off-grid dwelling, series wiring is often the answer for your battery bank. It's a key part of how to size an off-grid solar system for efficient power delivery.
When Parallel Wiring is Preferable
On the other hand, parallel wiring is chosen when you want to increase the Amp-hour capacity of your battery bank while maintaining the same voltage. If you have a 12V system and you want to double your stored energy without changing your system's voltage, you would connect two 12V batteries in parallel. The voltage remains 12V, but your total available Amp-hours double.
Parallel wiring is common in smaller systems, like those found in RVs, vans, or small sheds, where 12V appliances are prevalent, and the need for higher voltage isn't there. It's also ideal when you need to increase your "days of autonomy" – how long your system can run without sun. For instance, if your 12V system runs out of juice too quickly on cloudy days, adding another 12V battery in parallel will give you more stored energy without needing to upgrade your inverter to a higher voltage. Just like with series connections, it's crucial that batteries in a parallel bank are of the same voltage, capacity, and type to ensure balanced charging and discharging. Our article on How to Wire a Battery Bank provides more insight into parallel connections.
Combining Series and Parallel for More Complex Systems
For larger, more sophisticated off-grid solar systems, you might find yourself needing to create a combination of series and parallel connections. This is often referred to as a "series-parallel" configuration. This approach allows you to achieve both a higher voltage and a greater capacity.
For instance, if you have eight 12V, 100Ah LiFePO4 batteries and you want a 48V system with 200Ah capacity, you would connect them in two strings of four batteries each (4 x 12V = 48V). Then, you would connect those two 48V strings together in parallel. This effectively doubles your 48V capacity from 100Ah to 200Ah. This kind of configuration requires careful planning to ensure all connections are robust and that each parallel string has matching batteries. It's crucial for maximizing both voltage and capacity, especially when you're looking to achieve greater energy storage and deliver substantial power to your off-grid property. Understanding Battery Bank Wiring Configurations is essential for advanced setups.
When setting up your battery bank, think about your current and future needs. What voltage does your inverter require? How much energy do you realistically need to store for cloudy days or peak usage? Answering these questions will guide you to the correct wiring scheme.
| Feature | Series Wiring | Parallel Wiring |
|---|---|---|
| Primary Effect | Increases total voltage | Increases total Amp-hour capacity |
| Voltage | Sum of individual battery voltages | Stays the same as individual battery voltage |
| Capacity (Ah) | Stays the same as individual battery capacity | Sum of individual battery capacities |
| Current | Stays the same as individual battery current | Sum of individual battery currents (when discharging) |
| Cable Sizing | Output cables to system sized for system current | Output cables to system sized for sum of currents |
| Best For | Higher voltage inverters (24V, 48V), efficient power transfer over distance | Increasing run-time at same voltage, small 12V systems |
| Typical Use | Off-grid homes, larger cabins | RVs, vans, small sheds, backup power |
Disclaimer
The information provided in this guide is for educational and informational purposes only. Working with electricity and batteries can be dangerous. Always exercise extreme caution, follow all safety guidelines, and consult with a qualified electrician or solar professional if you are unsure about any steps or aspects of your off-grid solar installation. The author and publisher are not liable for any personal injury, property damage, or other loss that may result from the use or misuse of the information contained herein.