Battery Bank Wiring Configurations
Trying to make sense of battery bank wiring can feel like deciphering a secret code, leaving you scratching your head, worrying about frying expensive equipment, or worse, creating a safety hazard. It's a common source of anxiety for anyone venturing into off-grid living, but it doesn't have to be. This comprehensive guide is here to break down the ins and outs of series, parallel, and series-parallel battery wiring configurations, helping you understand how to safely and effectively set up your off-grid solar power system.
Understanding the Core Principles of Battery Wiring
Before we dive into the nitty-gritty of wiring configurations, it's absolutely crucial to grasp the fundamental electrical concepts that govern how batteries interact. Without a solid understanding of these basics, you're essentially building a house without a foundation, and we definitely don't want that when dealing with electricity!
Voltage, Amperage, and Wattage in Battery Banks
When we talk about off-grid battery banks, three terms come up constantly: voltage (V), amperage (A or Ah), and wattage (W or Wh). They're all interconnected, but each describes a different aspect of electricity.
Voltage, often thought of as the "pressure" of electricity, determines how much potential energy each electron carries. A higher voltage means more 'push' behind the electricity. Your appliances and inverter will have a specific voltage requirement – commonly 12V, 24V, or 48V for off-grid systems. The system voltage is usually matched to the inverter's input requirements. For example, if you're running a larger home system with a powerful inverter, you'll likely be aiming for a 24V or 48V battery bank because higher voltages reduce the current (amperage) needed to deliver the same amount of power, which in turn means you can use thinner, less expensive wiring. This is a critical factor when you're working through the calculations for your overall How to Size an Off-Grid Battery Bank.
Amperage, or current, is the "flow" of electricity – how many electrons are moving through the circuit per second. When it comes to batteries, we often discuss amp-hours (Ah), which is a measure of capacity. An amp-hour tells you how many amps a battery can deliver for one hour before it's depleted. For instance, a 100Ah battery can theoretically provide 100 amps for one hour, or 1 amp for 100 hours. This is vital for understanding how long your appliances can run. You'll need to learn How to Calculate Battery Amp-Hours Needed during your system design.
Wattage is the actual "power" being consumed or produced, and it's simply voltage multiplied by amperage (Watts = Volts x Amps). Watt-hours (Wh) measure total energy over time. Your off-grid system needs to generate enough watt-hours from your solar panels to replenish the watt-hours consumed from your battery bank. Understanding these three relationships helps you select the right components and wire your batteries effectively, preventing overloads or underperformance.
The Importance of Matching Batteries
You might be tempted to use whatever batteries you have lying around, or to add a new battery to an existing bank without much thought. Resist that urge! Mixing batteries of different types, ages, or capacities within the same bank is one of the most common and detrimental mistakes people make in off-grid solar setups. It's like trying to run a race with one runner wearing lead boots and another wearing roller skates – it just won't work efficiently, and someone's going to get hurt (or, in this case, a battery will).
For optimal performance and longevity, all batteries in a bank should be identical. This means the same brand, model, chemistry (e.g., all LiFePO4, or all AGM), capacity (Ah), and ideally, the same age and state of charge when first connected. When you mix different batteries, they'll have varying internal resistances, charging characteristics, and discharge curves. This leads to what's known as "imbalance." Some batteries will charge faster, others slower; some will discharge more deeply, others less. The weakest battery in the chain will always be the bottleneck, limiting the performance of the entire bank and eventually failing prematurely, which can then put undue stress on the other, stronger batteries. This accelerated degradation can significantly reduce the overall lifespan of your expensive battery bank, leading to frustrations and unexpected replacement costs much sooner than anticipated. It's also why understanding How Battery Choice Affects Off-Grid Cost is so important upfront.
Series Wiring Configuration
Series wiring is one of the fundamental ways to connect your batteries, and it's primarily used when you need to increase the overall voltage of your battery bank to match your inverter or other system components. It's straightforward in concept but has specific implications for your system's performance and maintenance.
How Series Wiring Works
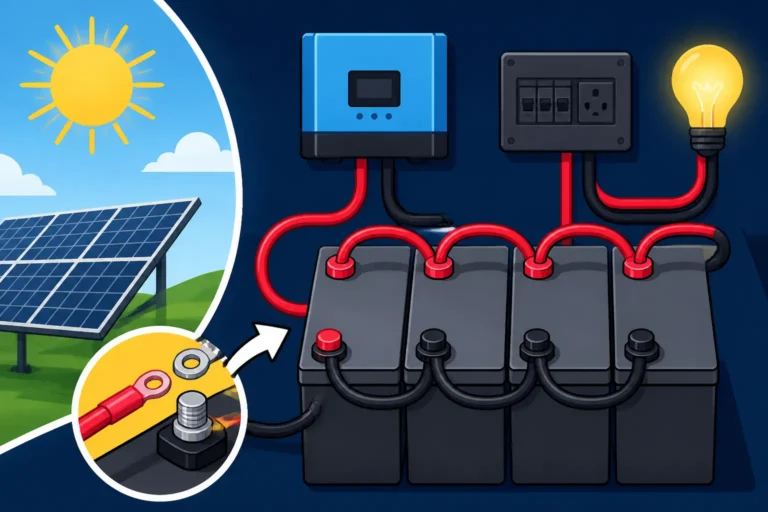
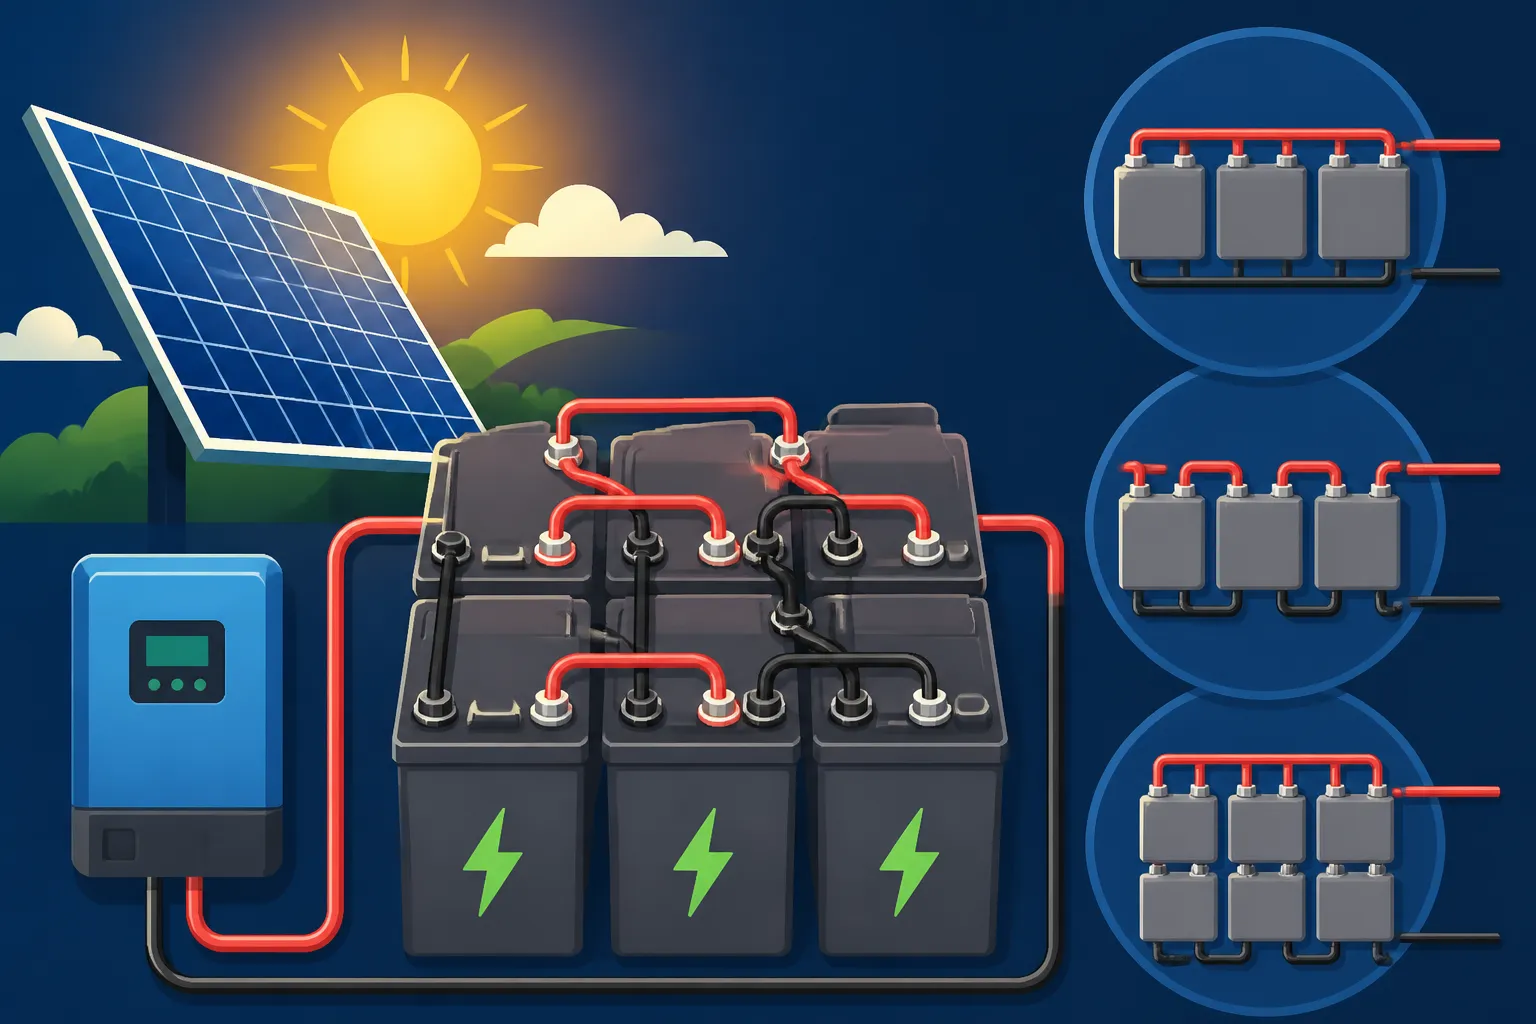
Imagine lining up several buckets of water, one on top of the other. The water pressure at the bottom would be the sum of the pressure from each bucket. That's a bit like how series wiring works with batteries. When you connect batteries in series, you connect the positive terminal of one battery to the negative terminal of the next battery. You continue this pattern until all batteries are connected, and then you take your main positive connection from the first battery's positive terminal and your main negative connection from the last battery's negative terminal.
What happens electrically? The voltage of the individual batteries adds up. So, if you have two 12V batteries wired in series, your total bank voltage becomes 24V. If you add two more 12V batteries to that series, you'd end up with a 48V bank. Crucially, the amperage capacity (Ah) of the bank remains the same as that of a single battery. So, four 12V 100Ah batteries in series will give you a 48V 100Ah bank. This configuration is particularly useful for larger off-grid homes or cabins where higher system voltages (like 24V or 48V) are preferred for efficiency and to reduce wire thickness requirements, especially when designing for specific system voltages like those discussed in 12V vs 24V vs 48V: Which to Choose.
Pros and Cons of Series Wiring
There are definite advantages to opting for a series configuration, especially as your power needs grow. The primary benefit is achieving a higher system voltage. This is often necessary to match the input requirements of powerful inverters, which are typically designed for 24V or 48V systems. Higher voltages also mean lower current for a given power output (remember W = V x A). Lower current translates to less energy loss due to resistance in your cables (voltage drop) and allows you to use thinner, more cost-effective wiring throughout your system, particularly for long runs from your solar array to your charge controller or from your batteries to your inverter. This can be a significant cost-saver and simplify cable management.
However, series wiring comes with its own set of challenges. The biggest drawback is that the entire battery bank is only as strong as its weakest link. If one battery in a series string fails, goes dead, or even just performs poorly, it can bring down the performance—or even the entire operation—of the whole bank. Imagine trying to power your well pump or run critical appliances in your remote cabin, only to find that one aging battery has decided to call it quits, leaving your entire 48V system dead in the water. Furthermore, achieving perfect balance among batteries in a series can be more challenging without a robust Battery Management System (BMS), particularly for LiFePO4 batteries, or careful manual balancing for lead-acid types. Imbalances can lead to some batteries being overcharged or over-discharged, reducing their lifespan.
Parallel Wiring Configuration
Parallel wiring is another essential configuration in off-grid solar systems, especially when your goal isn't to increase voltage but rather to boost the total energy storage capacity of your battery bank while maintaining a consistent voltage. This is a common setup for smaller systems or those operating at lower voltages like 12V.
How Parallel Wiring Works
If series wiring is like stacking buckets to increase pressure, parallel wiring is like placing several buckets side-by-side and connecting them at the top and bottom. When batteries are connected in parallel, you connect all the positive terminals together and all the negative terminals together. You then take your main positive connection from one of the positive terminals and your main negative connection from one of the negative terminals (ideally from diagonally opposite ends of the bank for better current distribution, but we'll get into best practices later).
Electrically, what happens is that the voltage of the bank remains the same as that of a single battery. So, if you connect four 12V 100Ah batteries in parallel, your bank will still be 12V. However, the amperage capacity (Ah) of the bank adds up. In our example of four 12V 100Ah batteries, your total bank capacity would be a robust 12V 400Ah. This configuration is fantastic for situations where you need more runtime for your appliances without needing to step up to a higher system voltage. Think of a tiny home or an RV, where you might want to extend the life of your refrigerator or keep your lights running longer on a cloudy day, all while maintaining your comfortable 12V system. Many components for RV-specific setups, like those offered by Renogy, are designed with 12V parallel banks in mind to maximize accessible capacity.
Pros and Cons of Parallel Wiring
The most significant advantage of parallel wiring is the substantial increase in total usable capacity. If you're running a 12V system in your van and find yourself constantly running out of power, adding another 12V battery in parallel can effectively double your usable amp-hours, giving you more "days of autonomy" to weather cloudy stretches. Another benefit is that a single failing battery in a parallel bank is less likely to completely shut down your entire system. The other batteries can often continue to supply power, albeit at a reduced total capacity, allowing you more time to diagnose and replace the faulty unit. It also makes expanding your system easier down the line; if your needs grow, you can often add another identically matched battery in parallel without overhauling your entire setup.
However, parallel wiring isn't without its challenges. Because the voltage remains low, delivering a significant amount of power (high wattage) requires a proportionally high current. This means you'll need much thicker and often more expensive cables to minimize voltage drop and safely carry those higher currents, especially between the battery bank and your inverter. If not wired correctly, parallel banks can suffer from current imbalances, where some batteries work harder or receive less charge than others, leading to uneven aging. This issue is particularly pronounced if the connecting cables are not all of the exact same length and gauge. Another common mistake is connecting loads or charging sources to only one end of the parallel bank, creating an unequal draw and charge across the batteries. Ensuring robust connections and proper cable management, perhaps with high-quality busbars available on platforms like Amazon, becomes even more critical in parallel setups.
Series-Parallel Wiring Configuration
For many off-grid solar enthusiasts, the ideal solution often lies in a hybrid approach: combining the best aspects of both series and parallel wiring. This series-parallel configuration allows you to achieve both a higher system voltage and a greater overall capacity, making it the workhorse for medium to large-scale off-grid systems, from homesteads to extensive cabin setups.
Combining Series and Parallel for Optimal Performance
Imagine you need a 24V system, but you also want a lot of amp-hour capacity that a single string of two 12V batteries (in series for 24V) just can't provide. This is where series-parallel comes in. You start by creating multiple "strings" of batteries wired in series to achieve your desired system voltage. For example, you might take two 12V 100Ah batteries and wire them in series to create a 24V 100Ah string. Then, if you need more capacity, you create another identical 24V 100Ah string. Finally, you wire these two 24V strings in parallel with each other. The result? You'd have a 24V 200Ah battery bank!
The process involves:
- Forming Series Strings: Connect batteries in series to reach your desired system voltage (e.g., positive to negative for a 24V or 48V string). Ensure all batteries within each string are identical.
- Connecting Strings in Parallel: Once you have your series strings, you connect the positive terminals of all the strings together, and similarly, connect all the negative terminals of the strings together. This effectively increases your overall amp-hour capacity while maintaining the series-configured voltage.
For larger banks, especially 48V systems, this method allows you to use common 12V or 6V deep-cycle batteries, configuring them into powerful, high-capacity banks. This approach helps achieve the robust power needs often found in year-round off-grid living, as discussed in detail in guides like How to Design for Year-Round Off-Grid Power.
Advantages and Considerations for Series-Parallel
The primary advantage of a series-parallel configuration is its incredible flexibility and scalability. You get the voltage benefits of series wiring (less current, thinner wires, less voltage drop) combined with the capacity benefits of parallel wiring (more stored energy, longer runtime). This makes it the go-to configuration for most comprehensive off-grid systems that power everything from lighting and refrigeration to a well pump or even a mini-split air conditioner. It allows you to build a substantial battery bank that can handle significant loads and provide ample energy storage. Plus, if one battery in one of the series strings were to fail, it would only affect that specific string's contribution to the parallel bank, rather than taking down the entire system instantly.
However, this configuration is also the most complex to design and wire correctly. It demands meticulous attention to detail to ensure proper balance across all batteries and strings. All series strings must be absolutely identical in terms of battery type, age, and initial charge, otherwise, you'll still face imbalance issues that degrade performance and lifespan. The wiring must be carefully planned, especially the inter-string connections, to ensure even current distribution. Incorrect wiring can lead to some strings being overcharged or undercharged, leading to premature failure. Regular monitoring and potentially more sophisticated battery management systems are highly recommended to keep such a complex bank healthy. Despite the added complexity, for anyone serious about reliable, long-term off-grid power, mastering the series-parallel configuration is an absolute must.
Essential Best Practices for Battery Bank Wiring
Wiring a battery bank for an off-grid solar system isn't just about connecting positives and negatives; it's about safety, efficiency, and longevity. Cutting corners here can lead to poor performance, equipment damage, or even dangerous electrical hazards. Let's delve into the best practices that ensure your battery bank operates safely and effectively for years to come.
Proper Cable Sizing and Connectors
One of the most overlooked yet critical aspects of battery bank wiring is using the correct cable size, also known as gauge. Too thin a cable for the amount of current it's carrying will lead to excessive resistance, causing significant voltage drop, heat buildup, and wasted energy. Imagine trying to drink a milkshake through a tiny coffee stirrer – you'd get very little, very slowly, and with a lot of effort. That's what happens with undersized wires. For high-current DC circuits like those found in battery banks, especially with 12V or 24V systems, thick, high-quality copper cables are non-negotiable. The length of the cable also plays a crucial role; longer runs require even thicker wire to minimize voltage drop. You'll want to review resources like How to Size Wire and Cables to get precise calculations for your setup.
Beyond gauge, the quality of your connectors is paramount. Always use high-quality, properly crimped copper lugs for all battery terminals and busbar connections. Soldering large gauge cables to lugs is generally discouraged in high-vibration environments or for high-current applications, as solder can melt or become brittle. After crimping, applying heat-shrink tubing over the connections provides insulation and protection against corrosion and accidental short circuits. All these small details contribute significantly to the safety and efficiency of your system. You can often find excellent quality marine-grade cables and lugs on sites like Amazon, which are specifically designed for robust electrical connections.
Fusing and Circuit Protection
If there's one area where you absolutely cannot compromise, it's circuit protection. Fuses and breakers are the lifeguards of your off-grid electrical system; they are designed to sacrifice themselves to protect your expensive batteries, inverter, and wiring from overcurrents, short circuits, and potential fires. Never, under any circumstances, operate an off-grid battery bank without proper fusing.
Every positive battery cable should have a correctly sized fuse located as close to the battery's positive terminal as possible. This includes individual battery fuses in parallel banks, string fuses in series-parallel banks, and a main fuse for the entire battery bank before it connects to the inverter or charge controller. The fuse's rating should be matched to the cable's ampacity and the equipment it's protecting. For instance, a main battery bank fuse should be rated slightly higher than the maximum continuous output of your inverter. Breakers can also be used, especially for applications where you might want to manually switch off sections or for overcurrent protection that can be reset, but fuses are generally more robust for critical battery bank protection. Take a deep dive into How to Size Fuses and Breakers for your specific components, as correctly calculating these ratings is vital.
Battery Monitoring and Management
Even with perfectly matched and properly wired batteries, you need a way to keep an eye on their health and manage their operation. This is where battery monitoring and management systems come into play. For Lithium Iron Phosphate (LiFePO4) batteries, a sophisticated Battery Management System (BMS) is usually integrated directly into the battery itself or sometimes as an external unit. A good BMS protects the battery from overcharging, over-discharging, over-current, and extreme temperatures, and also balances the cells within the battery, significantly extending its lifespan.
For any battery chemistry, a dedicated battery monitor with a shunt is an invaluable tool. It gives you real-time information on your battery's state of charge (like a fuel gauge for your tank), current draw/charge, voltage, and sometimes even temperature. This data is critical for understanding your power consumption and generation, helping you avoid excessively deep discharges that damage batteries. Brands like Victron Energy offer excellent battery monitors, though you can also find more affordable options from brands like Renogy that provide essential metrics. Understanding How to Choose an Off-Grid Battery Monitor for your system is a smart investment in its longevity.
Maintaining and Expanding Your Battery Bank
Once your battery bank is wired and operational, your job isn't done. Regular maintenance is key to maximizing its lifespan and performance. This includes periodically checking all terminal connections to ensure they are tight and free of corrosion. Clean any dust or debris from around the batteries, especially ventilation holes for lead-acid batteries. For lead-acid batteries, check electrolyte levels and top them up with distilled water as needed. For LiFePO4 batteries, maintenance is minimal, primarily focusing on ensuring the BMS is functioning correctly and monitoring overall health. Refer to a comprehensive Off-Grid Solar Maintenance Guide for detailed routines tailored to your battery type.
As your off-grid power needs evolve, you might consider expanding your battery bank. This can be a tricky process, particularly if you're adding new batteries to an existing bank. The cardinal rule of matching batteries applies strongly here: any new batteries added to an existing bank must be identical in type, capacity, and voltage to the existing ones, and ideally, as close in age and state of health as possible. Adding a brand-new battery to an old, degraded bank will only stress the new battery and shorten its life. If you're looking to significantly increase capacity or change voltage, it's often more prudent to start a new, larger, and matched battery bank. Always consult guides on How to Add Panels to an Existing System for insights that often apply to battery bank expansion as well, ensuring your system remains balanced and efficient. Also, be aware of the Cost to Replace Off-Grid Solar Batteries when planning future upgrades.
Battery Bank Wiring Comparison
To help visualize the differences between the wiring configurations, here's a table summarizing their key characteristics, advantages, and disadvantages.
| Feature | Series Wiring | Parallel Wiring | Series-Parallel Wiring |
|---|---|---|---|
| Voltage | Adds up (e.g., two 12V batteries = 24V) | Stays the same (e.g., two 12V batteries = 12V) | Adds up in strings, then stays the same across strings |
| Amperage Capacity | Stays the same (e.g., two 100Ah batteries = 100Ah) | Adds up (e.g., two 100Ah batteries = 200Ah) | Adds up across parallel strings |
| Primary Use Case | Achieving higher system voltage (e.g., 24V, 48V) | Increasing capacity at existing voltage (e.g., 12V) | Achieving both higher voltage and higher capacity |
| Wire Gauge Needed | Generally thinner for same power output | Generally thicker for same power output | Varies; thicker for parallel sections, thinner for series sections |
| Complexity | Low | Low-Medium | High |
| Failure Impact | One bad battery can disable the entire string | One bad battery reduces total capacity, system often continues | One bad battery can disable its string, reducing total capacity |
| Balancing Needs | Critical, especially without BMS | Important for even current distribution | Most critical, both within strings and across parallel strings |
| Ideal For | Matching high-voltage inverters, reducing line loss | Smaller 12V systems (RVs, vans) needing more run time | Medium to large off-grid homes/cabins needing robust power and storage |
Disclaimer
The information provided in this article is for general guidance and educational purposes only. While we strive to offer accurate and up-to-date information, off-grid solar system design and installation involve electrical work that can be dangerous if not performed correctly. Always consult with a qualified electrician or solar professional before undertaking any wiring or installation projects. Improper installation can lead to property damage, serious injury, or even death. Ensure you comply with all local electrical codes and permitting requirements.