How to Test Panel Output
It's incredibly frustrating when your off-grid solar system isn't producing the power you expect, leaving you wondering if your panels are truly pulling their weight. You might see your battery bank slowly draining instead of charging, or notice your appliances struggling, and the big question looms: are my solar panels actually working as they should? This comprehensive guide will walk you through exactly how to test your solar panel output, helping you diagnose issues, ensure optimal performance, and give you peace of mind that your energy source is reliable.
Why Testing Your Solar Panels is Crucial
Living off-grid, you quickly learn that every watt counts. When your power system starts acting finicky, your first thought might be the batteries, or perhaps the inverter. But often, the problem can stem directly from your solar panels, those silent workhorses on your roof or in your field. Ignoring potential issues with your panels can lead to much bigger headaches down the road, from consistently low battery charge to complete system failure. Regularly checking your solar panel output isn't just about troubleshooting; it's about proactive maintenance and ensuring the longevity and efficiency of your entire off-grid setup.
Identifying Performance Issues Early
One of the most common frustrations for off-grid dwellers is the slow, insidious decline in system performance. You might not notice it day to day, but over weeks, you find yourself running the generator more often, or constantly watching your battery monitor with a growing sense of dread. This gradual drop in power generation can be caused by various factors, from a thin layer of dust and grime to more serious degradation over time. Early testing allows you to catch these subtle shifts before they become major problems. For instance, if you test your panels and find their voltage or current is slightly lower than expected, it might signal that they simply need a good cleaning, or perhaps a wiring connection has loosened. Addressing these minor issues promptly can prevent significant power loss and keep your system humming along efficiently. Think of it like a regular oil change for your car – it prevents bigger, more expensive breakdowns.
Maximizing Energy Harvest
In an off-grid setup, every ray of sunshine converted into usable electricity is precious. If your panels aren't performing at their peak, you're essentially leaving free energy on the table. Testing helps you confirm that your panels are delivering their rated output, or at least close to it, given the environmental conditions. This is especially vital if you've invested in quality panels, perhaps from a reputable brand like Renogy, and expect a certain level of performance. You want to ensure you're getting the most out of that investment. By routinely checking your panel output, you can confirm they are positioned optimally, free from unexpected shading, and aren't suffering from cell damage that might reduce their efficiency. This ensures your battery bank gets the full charge it needs each day, reducing reliance on backup generators and ultimately saving you money and stress. For a deeper dive into overall system health, check out our guide on Off-Grid Solar Maintenance Guide.
Troubleshooting a Malfunctioning System
When your off-grid system suddenly goes kaput, or you're just not getting any charge, it can feel like a real crisis. The troubleshooting process can be daunting, with so many components involved: panels, charge controller, batteries, inverter. Testing your solar panels directly helps you isolate the problem. If your panels are delivering their expected voltage and current, you can then confidently move on to inspect other parts of your system, such as your charge controller or battery bank. Conversely, if the panel output is significantly lower than expected, you've pinpointed a key area to investigate further, saving you time and effort. This methodical approach is critical for anyone living off-grid, where reliable power is non-negotiable. Our guide on How to Troubleshoot Off-Grid Solar offers more comprehensive troubleshooting steps.
Essential Tools for Testing Solar Panel Output
Before you climb up on the roof or head out to your ground mount array, you'll need a few crucial tools to get accurate readings. Don't worry, these aren't exotic pieces of equipment; most are readily available and indispensable for any serious off-grid homeowner. Investing in good quality tools now will save you countless headaches and potential repair costs down the line.
Multimeter or Clamp Meter
The absolute cornerstone of solar panel testing is a good quality multimeter. This device allows you to measure voltage (Volts), current (Amperes), and resistance (Ohms). For solar panels, you'll primarily be using the voltage and current functions. A digital multimeter is generally preferred for its precision and ease of reading. When choosing one, make sure it has a DC (direct current) voltage range of at least 100V and a DC amperage range of at least 10A, though higher is better for larger systems. Many modern multimeters also have a "clamp" feature, making them a clamp meter. This is incredibly useful for measuring current without having to break the circuit, which is a huge safety and convenience bonus when dealing with solar wiring. You can find decent clamp meters on Amazon, and they’re often a worthy upgrade.
When using a standard multimeter, you'll need to physically connect the probes to the positive and negative terminals of your panel or wiring. For current measurements, this means wiring the meter in series with the circuit, which can be a bit more complex and requires you to temporarily disconnect wires. This is why a clamp meter, which simply clamps around a single wire to measure the magnetic field produced by the current, is often recommended for its safety and simplicity when measuring current.
Solar Panel Test Kit
While a multimeter covers the basics, specialized solar panel test kits offer more comprehensive diagnostic capabilities, especially for larger or more complex systems. These kits often include a pyranometer (to measure solar irradiance in W/m²) and a temperature sensor, which are vital for comparing your panel's actual performance against its STC (Standard Test Conditions) ratings. Some advanced kits can even generate I-V curves, which plot the current-voltage relationship of your panel and can reveal subtle performance issues that a simple voltage or current reading might miss. These kits are more of an investment, but for those truly dedicated to optimizing their solar harvest or diagnosing persistent problems, they can be invaluable. However, for most DIYers and smaller off-grid setups, a reliable multimeter or clamp meter is sufficient to get a good sense of panel health.
Environmental Factors Measurement Tools
Your solar panels' output is heavily influenced by their environment. What's a "good" reading on a clear, cool day might be drastically different on a cloudy, scorching hot afternoon. To make sense of your multimeter readings, you need to understand these variables.
- Irradiance Meter (Pyranometer): This tool measures the amount of solar radiation hitting your panels in Watts per square meter (W/m²). Standard Test Conditions (STC) assume 1000 W/m², so knowing the actual irradiance helps you normalize your panel's output to current conditions. If you're only getting 500 W/m² due to haze or time of day, your panel won't produce its full rated power, and that's perfectly normal.
- Temperature Sensor: Solar panels become less efficient as they get hotter. Knowing the panel's surface temperature is crucial for adjusting your expectations. A simple infrared thermometer, often available at hardware stores or online, can give you quick, non-contact temperature readings of your panel's surface. A typical panel's output decreases by about 0.3-0.5% for every degree Celsius above 25°C (77°F). Without these environmental measurements, it’s like trying to judge a race car’s performance without knowing if it’s on a dry track or a muddy one.
Step-by-Step Guide to Testing Solar Panel Output
Alright, now that you've got your tools, let's get down to actually testing those panels. This isn't rocket science, but it does require a methodical approach and, most importantly, a commitment to safety. Always remember that solar panels can generate significant voltage and current, even on a cloudy day, so treating them with respect is key.
Safety First: Preparing for the Test
Before you touch any wires, prioritize your safety.
- Wear appropriate PPE: This includes insulated gloves, safety glasses, and sturdy, non-slip shoes if you're working on a roof.
- Disconnect the system: For individual panel testing, you'll need to disconnect the panel from the rest of your off-grid solar system. This typically means disconnecting it from the charge controller. Ensure your inverter and charge controller are turned off, and any DC breakers are open. If you're testing an entire array, you might only need to disconnect it from the charge controller, but always be aware of live wires.
- Work in a safe environment: Avoid working in wet conditions. Ensure your ladder is stable if working at height.
- Understand your panel's specs: Have the manufacturer's datasheet for your solar panels handy. You'll need the Open Circuit Voltage (Voc) and Short Circuit Current (Isc) ratings, typically listed under STC (Standard Test Conditions) and NOCT (Normal Operating Cell Temperature). These are your benchmarks. If you're unsure where to find them, a quick online search for your specific panel model, perhaps "Renogy 100W panel specs," should yield results.
Failing to take these precautions could lead to electrical shock or damage to your equipment. For comprehensive safety measures, our Off-Grid Solar Safety and Grounding guide is a must-read.
Measuring Open Circuit Voltage (Voc)
Open Circuit Voltage (Voc) is the maximum voltage your solar panel can produce when it's not connected to any load – essentially, when no current is flowing. It's the easiest measurement to take and a good first indicator of a panel's health.
- Isolate the panel: Ensure the panel is completely disconnected from any load, charge controller, or other panels in a string.
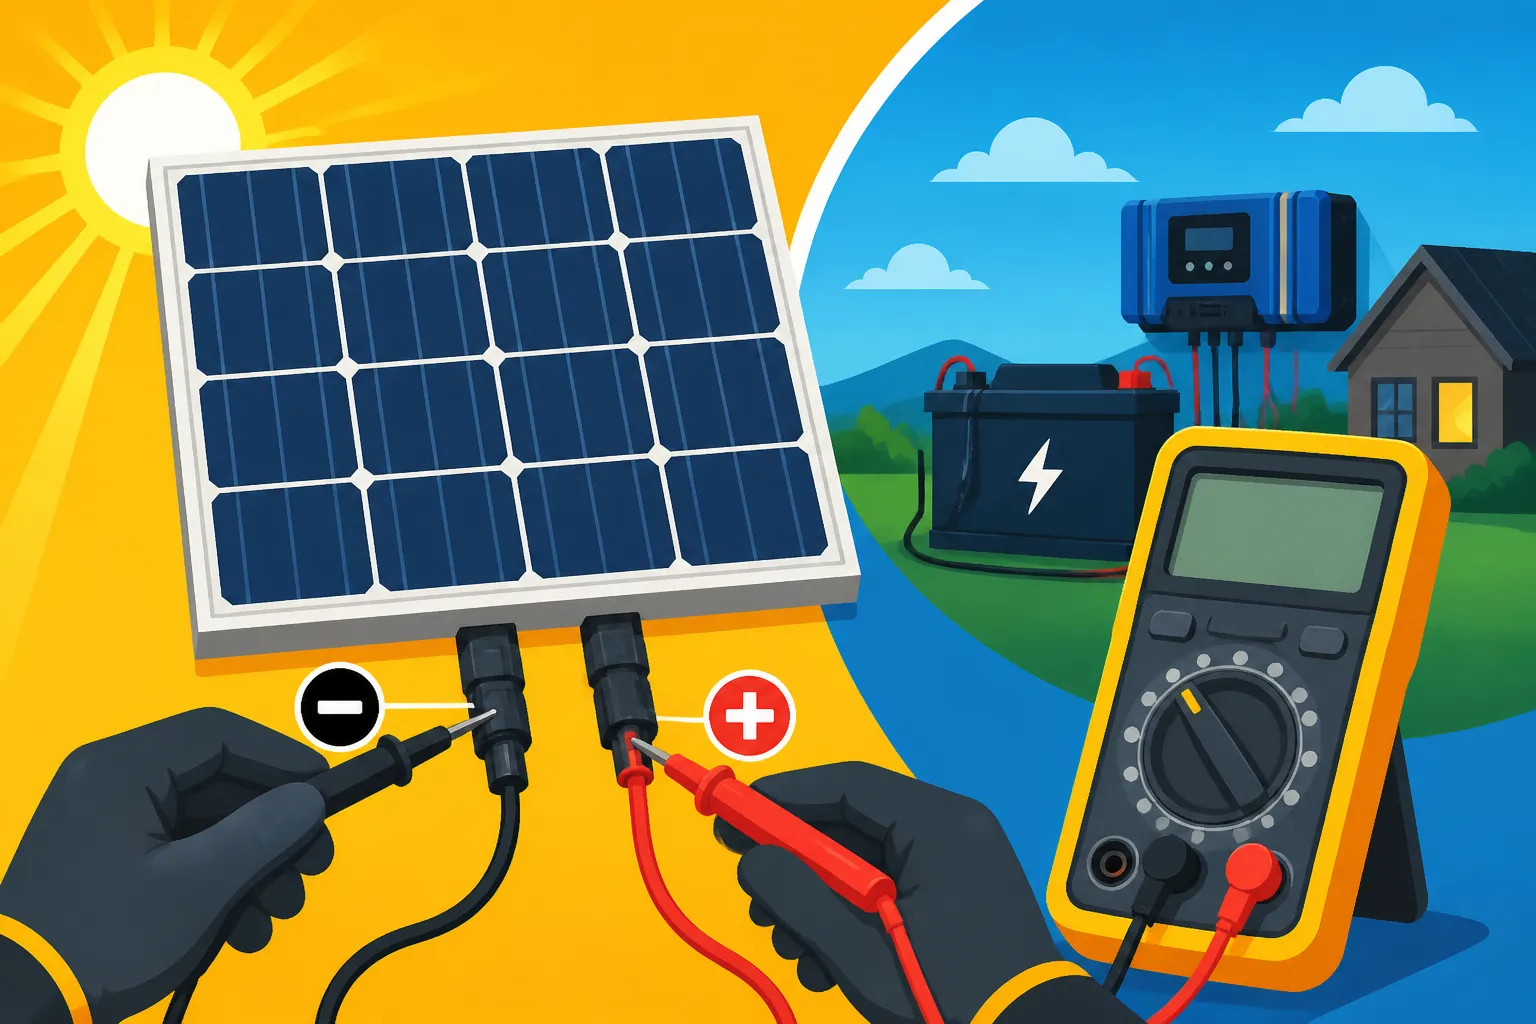
- Set your multimeter: Turn your multimeter's dial to the DC Voltage setting, usually indicated by a "V" with a straight line above it. Choose a range higher than your panel's expected Voc (e.g., if your panel is rated for 20V, set the meter to 200V).
- Connect the probes: Carefully touch the red (positive) probe to the positive terminal of the solar panel (often the male MC4 connector) and the black (negative) probe to the negative terminal (female MC4 connector).
- Read the display: Note the voltage reading. Compare this to the Voc rating on your panel's datasheet. Keep in mind that your reading will vary based on current solar irradiance and temperature. On a bright, sunny day, you should expect to see a reading close to or slightly above the STC Voc rating, especially if the panel is cool. If it's significantly lower, say 50% less, it could indicate severe cell damage, internal wiring issues, or even a complete panel failure. If it reads zero, double-check your connections and your meter settings.
Measuring Short Circuit Current (Isc)
Short Circuit Current (Isc) is the maximum current your solar panel can produce when its positive and negative terminals are directly connected, effectively creating a short circuit. While "short circuit" sounds scary, it's generally safe for solar panels for brief periods and is a standard test to assess current production capability.
- Set your multimeter/clamp meter: If using a multimeter, switch the dial to the DC Amperage (A) setting. Again, choose a range higher than your panel's expected Isc (e.g., if your panel is rated for 5A, set the meter to 10A or higher). Crucially, when measuring current with a standard multimeter, you MUST connect the meter in series with the circuit. This means disconnecting one of the panel's leads (e.g., the positive) and connecting the multimeter's red probe to the panel's positive terminal and the black probe to the disconnected lead that would normally connect to the next component. This creates the "short circuit" through the meter.
- Using a clamp meter: If you have a clamp meter, this step is much simpler and safer. Set it to DC Amperage and clamp it around only one of the panel's output wires (either positive or negative). Make sure no other wires are inside the clamp.
- Read the display: Note the current reading. Compare this to the Isc rating on your panel's datasheet. This reading is highly dependent on solar irradiance. On a bright day, you should see a reading close to the STC Isc. A significantly lower Isc could suggest issues like shading, dirt accumulation, or damaged cells that are impeding current flow. A reading of zero indicates a severe blockage in current flow or a completely dead panel. Remember, even partial shading on a single cell can drastically reduce the Isc of an entire panel or string.
Measuring Under Load (Operating Voltage and Current)
While Voc and Isc are good baseline tests, they don't tell you how your panel performs when actually doing work – generating power for your system. Measuring voltage and current under load gives you a more realistic picture of your panel's actual output. This is often referred to as maximum power point (Pmax) if you have the right equipment, but for practical purposes, we're looking at typical operating conditions.
- Reconnect the panel: Reconnect your panel to your charge controller, and ensure the charge controller is connected to your battery bank. Turn on your charge controller and any necessary breakers.
- Measure operating voltage: Using your multimeter set to DC Voltage, measure the voltage directly at the output terminals of the solar panel while it's connected and charging your batteries. This will be lower than Voc, as current is now flowing. This is your Vmp (voltage at maximum power point) if your system is optimized, or simply the operating voltage under load.
- Measure operating current: Using your clamp meter (or multimeter in series if you dare), measure the current flowing from the solar panel to the charge controller. This will be your Imp (current at maximum power point), or operating current under load.
- Calculate actual power: Multiply your operating voltage by your operating current (P = V x I). This gives you the actual power (in Watts) your panel is producing at that moment.
- Compare to rated power: Compare this calculated power to your panel's rated power (e.g., 100W, 200W). Again, account for irradiance and temperature. A reading of 80 watts from a 100-watt panel on a bright day with average temperatures might be acceptable, but 50 watts would indicate a problem. This "real-world" measurement is probably the most useful for understanding day-to-day performance. Learning How Much Watt-Hours You Use Per Day can help you set realistic expectations for your panels' output versus your consumption.
Interpreting Your Solar Panel Test Results
You've got a handful of numbers now, but what do they mean? This is where the detective work truly begins. Don't just look for perfect matches to manufacturer specs; understand the context. Off-grid living teaches you flexibility, and solar panel performance is no exception.
Comparing to Manufacturer Specifications
Your panel's datasheet is your bible for interpretation. It lists the electrical characteristics under Standard Test Conditions (STC): 1000 W/m² solar irradiance, 25°C (77°F) cell temperature, and an air mass of 1.5. These are ideal lab conditions rarely perfectly replicated in the real world. You'll also typically find NOCT (Normal Operating Cell Temperature) ratings, which are often more realistic, assuming 800 W/m² irradiance and 45°C (113°F) cell temperature.
- Voc and Isc: Your measured Voc should be relatively close to the STC Voc on a clear, cool day. Isc is more directly proportional to irradiance, so expect it to be lower than STC Isc if the sun isn't at its absolute peak. If your Voc is significantly off, it points to a major internal issue, like a broken cell connection. If your Isc is low, it's often an external factor like shading, dirt, or a cloudy sky.
- Power output: When calculating power (Vmp x Imp or operating V x I), compare it to the panel's rated wattage. If your 200W panel is only giving you 120W on a perfectly clear day, that's a red flag. However, if it's a hazy day or the panel is blazing hot (common in summer), that 120W might be perfectly normal. This is why measuring irradiance and temperature is so important; it gives context to your readings. Remember, panels degrade slowly over time, typically losing 0.5-1% of their output per year, so an older panel won't produce exactly what it did new.
Common Issues Indicated by Readings
Your test results can point to various common problems:
- Low Voc, Normal Isc: This is rare, but could indicate internal cell damage or a bypass diode failure that's effectively shortening part of the array, but allowing current to flow.
- Normal Voc, Low Isc: This is very common. The panel is generating voltage, but current flow is inhibited. Causes include:
- Shading: Even partial shading can dramatically reduce Isc. Check for tree branches, antennas, or even bird droppings.
- Dirt/Dust: A layer of grime can block sunlight. See our guide on How to Clean Off-Grid Solar Panels for tips.
- Micro-cracks or cell damage: These can be invisible to the naked eye but reduce efficiency.
- Loose wiring or corroded connections: Check MC4 connectors and wiring leading to the charge controller.
- Low Voc and Low Isc: This suggests a major problem, like severe damage to the panel, a completely broken connection, or even a faulty multimeter. If both are low, it's often a dead panel or a total wiring break from the panel itself.
- Zero Readings: If you get absolutely no voltage or current, ensure your multimeter is working (test a household battery), your probes are making good contact, and the panel isn't completely covered. If all checks out, the panel is likely completely defunct or has a severed connection internally.
What to Do When Readings Are Off
So, your numbers aren't looking so hot. Don't panic! Here's a systematic approach to addressing the issues:
- Recheck Environmental Factors: Is it genuinely a perfectly sunny day? Is the panel excessively hot? Use your irradiance and temperature tools to provide context. Clouds, haze, or even the time of day can significantly impact readings.
- Visual Inspection: Give your panels a thorough visual inspection. Look for:
- Shading: Even a small shadow can cause disproportionate power loss due to series connections.
- Dirt, dust, bird droppings: Clean the panels.
- Cracks or physical damage: Look for any signs of impact, delamination (peeling layers), or discoloration (hot spots) on the cells.
- Damaged wiring: Check the MC4 connectors for cracks or corrosion. Make sure the wires aren't frayed or chewed by animals.
- Check Connections: Loose or corroded connections are notorious for causing voltage drops and current resistance. Disconnect and reconnect MC4s, ensure they are securely clicked into place. Inspect terminal blocks on combiner boxes or charge controllers for tightness. This is often where many Off-Grid Solar Panels Installation Mistakes to Avoid occur.
- Isolate the problem: If you have multiple panels, test each one individually. This helps you pinpoint the specific problematic panel rather than replacing an entire string.
- Consider bypass diodes: Modern panels have bypass diodes to allow current to flow around shaded or damaged cells. If a diode fails, it can drastically reduce the output of a section of the panel. This is harder to test without specialized equipment, but if you suspect one, you might need professional help or consider replacing the panel.
- Contact manufacturer/supplier: If you've done all your troubleshooting and believe the panel itself is faulty, especially if it's still under warranty, contact the manufacturer or the place you purchased it (like Renogy or from Amazon) with your test results. They may offer repair or replacement. Our guide on Best Off-Grid Solar Panels can help you understand what reliable panels offer in terms of warranty.
Here's a quick reference table to help summarize your interpretation:
| Reading Type | Expected Result (Sunny Day, 25°C) | Common Issue if Low | What to Check First |
|---|---|---|---|
| Open Circuit Voltage (Voc) | Close to STC Voc (±5-10%) | Internal cell damage, broken circuit | Panel damage, multimeter function, connections |
| Short Circuit Current (Isc) | Close to STC Isc (±10-20%) | Shading, dirt, cell damage | Shading, cleanliness, wiring, module integrity |
| Operating Power (Vmp x Imp) | 70-90% of Rated Wattage (real world) | Shading, dirt, system mismatch | All of the above, charge controller settings, battery health |
Remember, consistency is key. Keep a log of your readings over time. This helps you establish a baseline and more easily identify when something starts to go awry. Regular checks are your best defense against unexpected power outages.
Disclaimer
Please be aware that working with electrical systems, especially solar, can be dangerous. Always prioritize safety, disconnect power sources when necessary, and consult with a qualified electrician or solar professional if you are unsure or uncomfortable performing any of these tests. This guide is for informational purposes only and does not substitute professional advice.