How to Seal Cable Entries on a Cabin
Running cables for your off-grid solar setup into your cozy cabin can feel like a daunting task, especially when you think about punching holes in your perfectly insulated walls. The truth is, one of the biggest headaches for off-grid homeowners is dealing with moisture intrusion, pests, and energy loss that can sneak in through poorly sealed cable entries. This guide is here to walk you through the nitty-gritty of creating secure, watertight, and critter-proof cable entry points for your solar system, ensuring your cabin stays snug and your power flowing smoothly.
Why Proper Sealing Matters for Your Off-Grid Cabin
When you've put so much effort into designing and installing your off-grid solar system, it’s easy to overlook the finer details, like how those cables actually get inside your cabin. But trust me, neglecting the sealing of these entry points can lead to a world of frustration down the road. It’s not just about aesthetics; it's about the longevity of your cabin and the reliability of your power system.
Protecting Against the Elements
Your cabin, whether it's nestled deep in the woods or perched on a mountainside, is constantly battling the elements. Rain, snow, wind, and even intense sunlight can wreak havoc on unprotected openings. A small gap around a solar cable can become a direct pathway for water to seep into your walls, leading to rot, mold, and costly structural damage over time. Imagine a heavy downpour finding its way into your wall cavity, slowly decaying the wood behind your beautiful interior finishes – it’s a nightmare no one wants.
Beyond direct water ingress, constant exposure to moisture can also degrade your electrical wiring. While solar cables are designed to be weather-resistant, continuous dampness or direct water exposure at the entry point can compromise their insulation, leading to potential short circuits or reduced system efficiency. Preventing this early on is a crucial step in ensuring your system lasts as long as it should. If you're tackling your overall installation, make sure to read our comprehensive guide on Off-Grid Solar Installation Guide to cover all your bases.
Preventing Critter Ingress
There’s nothing quite like the unwelcome surprise of finding a family of mice or a colony of ants making themselves at home inside your cabin walls, especially after they've found their way in through a tiny, unsealed opening. Critters, from tiny insects to larger rodents, are always looking for a warm, dry, and sheltered place to nest, and a cable entry hole is practically an open invitation. They don't just bring unhygienic conditions; they can also cause significant damage.
Rodents, in particular, are notorious for chewing through electrical wires, which can not only interrupt your power supply but also create serious fire hazards. Imagine all your carefully laid Off-Grid Solar Wiring Best Practices being undermined by a persistent squirrel. Even insects, like carpenter ants, can cause structural damage over time by tunneling through damp wood. A robust seal acts as a physical barrier, deterring these unwanted guests and keeping your cabin a sanctuary for you, not for wildlife.
Maintaining Energy Efficiency
One of the main reasons many people choose off-grid living is to achieve energy independence and reduce their environmental footprint. A well-insulated cabin is fundamental to this goal. Every tiny crack or gap in your cabin’s envelope, including poorly sealed cable entries, allows conditioned air to escape in winter and seep in during summer. This thermal leakage forces your heating or cooling system to work harder, consuming more energy than necessary.
Even a small, unsealed hole can contribute to a noticeable draft, especially in colder climates. Over time, the cumulative effect of multiple small leaks can significantly impact your cabin's overall energy efficiency, increasing the demand on your solar system. This means your carefully sized system might feel inadequate, or your batteries might drain faster than expected. Proper sealing ensures that your hard-earned solar energy is used to power your appliances and keep your cabin comfortable, not wasted through tiny gaps.
Essential Materials and Tools for Sealing Cable Entries
Before you dive into sealing, gathering the right materials and tools is paramount. Trying to make do with what you have on hand often leads to shortcuts and, ultimately, less effective and less durable seals. Investing a little time and money upfront in the proper supplies will save you headaches and costly repairs down the road.
Key Sealing Materials
There’s a range of products specifically designed for sealing cable entries, each with its own advantages. Your choice will depend on the type of cables you're running, the material of your cabin wall, and the environmental conditions you expect.
- Cable Entry Glands/Plates: These are specialized devices designed to create a weatherproof seal around one or more cables as they pass through a surface. For solar applications, you'll often see them made of UV-resistant ABS plastic or aluminum. They typically feature a rubber gasket or compression fitting that cinches around the cable(s) to prevent water ingress. Many of these, like the ones from Renogy, are designed specifically for RVs or cabins and are a fantastic way to handle multiple cables.
- Marine-Grade Sealant (e.g., Silicone, Polyurethane): Once your cable entry plate is installed, you’ll need a good sealant to bond it securely to your cabin wall and fill any remaining tiny gaps. Marine-grade silicone sealants are excellent for their flexibility and extreme weather resistance, holding up against harsh UV rays and temperature fluctuations. Polyurethane sealants offer even stronger adhesion and durability, often preferred for more permanent installations. Make sure whatever you choose is rated for exterior use and capable of expanding and contracting with your cabin materials. You can find a good variety of these on Amazon.
- Butyl Tape: This highly flexible, sticky, and waterproof tape is fantastic for creating a primary seal directly beneath cable entry plates or around the cable itself before applying a final sealant. It molds perfectly to irregular surfaces, providing an immediate barrier against moisture. It's especially useful in conjunction with a more rigid sealant.
- Expanding Foam (Closed-Cell): For larger gaps or irregular holes where cables are running, a closed-cell expanding foam can be a lifesaver. It expands to fill voids, providing insulation and a barrier against pests. However, it's crucial to use closed-cell foam, as open-cell foam can absorb and hold water, leading to mold. Always follow up with a dedicated exterior sealant once cured, as foam alone isn't typically UV-resistant or fully waterproof for exterior applications.
Tools You'll Need
Having the right tools makes the job much smoother and safer. Don't skimp on these; they're an investment in a professional-grade finish.
- Drill and Hole Saw: You'll need a power drill and a hole saw bit sized appropriately for your chosen cable entry gland or plate. Measure carefully! A slightly undersized hole can be frustrating, while an oversized one is a headache to seal properly.
- Tape Measure and Pencil: For precise marking and placement of your entry point. "Measure twice, cut once" is the golden rule, especially when drilling into your cabin.
- Caulking Gun: For applying sealants smoothly and evenly.
- Utility Knife/Scraper: For trimming excess sealant, opening tubes, and cleaning surfaces.
- Denatured Alcohol or Acetone: Essential for cleaning surfaces before applying sealant. Any dirt, dust, or grease will compromise the adhesion of your sealant.
- Rags/Paper Towels: For cleaning up spills and excess sealant.
- Personal Protective Equipment (PPE): Gloves to protect your hands from sticky sealants, and safety glasses to protect your eyes from flying debris while drilling.
Having these tools and materials ready will allow you to work efficiently and achieve a truly professional, long-lasting seal. If you're building a new system, remember to refer to our guide on Off-Grid Solar Installation Tools Needed for a more comprehensive list of equipment.
Step-by-Step Guide to Sealing Solar Cable Entries
Now that you have your materials and tools assembled, it's time to get down to business. Sealing cable entries isn't rocket science, but it does require patience and attention to detail. Rushing this process almost guarantees problems down the line.
Preparing the Entry Point
The success of your seal heavily relies on how well you prepare the surface. Think of it like painting; the prep work is more important than the paint itself.
First, identify the exact location where your solar cables will enter the cabin. This spot should be as inconspicuous as possible, ideally on a north-facing wall (if practical) to minimize direct UV exposure to the seal, or under an eave for added protection. Ensure the chosen location provides a clear path for cables from your solar array (for instance, Best Off-Grid Solar Panels) to your charge controller and battery bank inside, minimizing sharp bends or unnecessary length. Before drilling, double-check for any internal wiring, plumbing, or structural elements that could be damaged. A stud finder can be invaluable here.
Once you’ve marked the spot, use your drill and hole saw to create a hole that matches the size of your cable entry gland or plate. Aim for a snug fit; you want enough room for the cables to pass through without being pinched, but not so much that you have a massive gap to fill. After drilling, meticulously clean both the interior and exterior surfaces around the hole. Remove any sawdust, dirt, grease, or loose paint. Using denatured alcohol or acetone and a clean rag will ensure the surface is perfectly clean and dry, allowing your sealant to adhere properly. This clean surface is critical for a strong, long-lasting bond.
Installing the Cable Gland or Entry Plate
This is where your chosen cable entry device comes into play, creating the primary physical barrier for your cables.
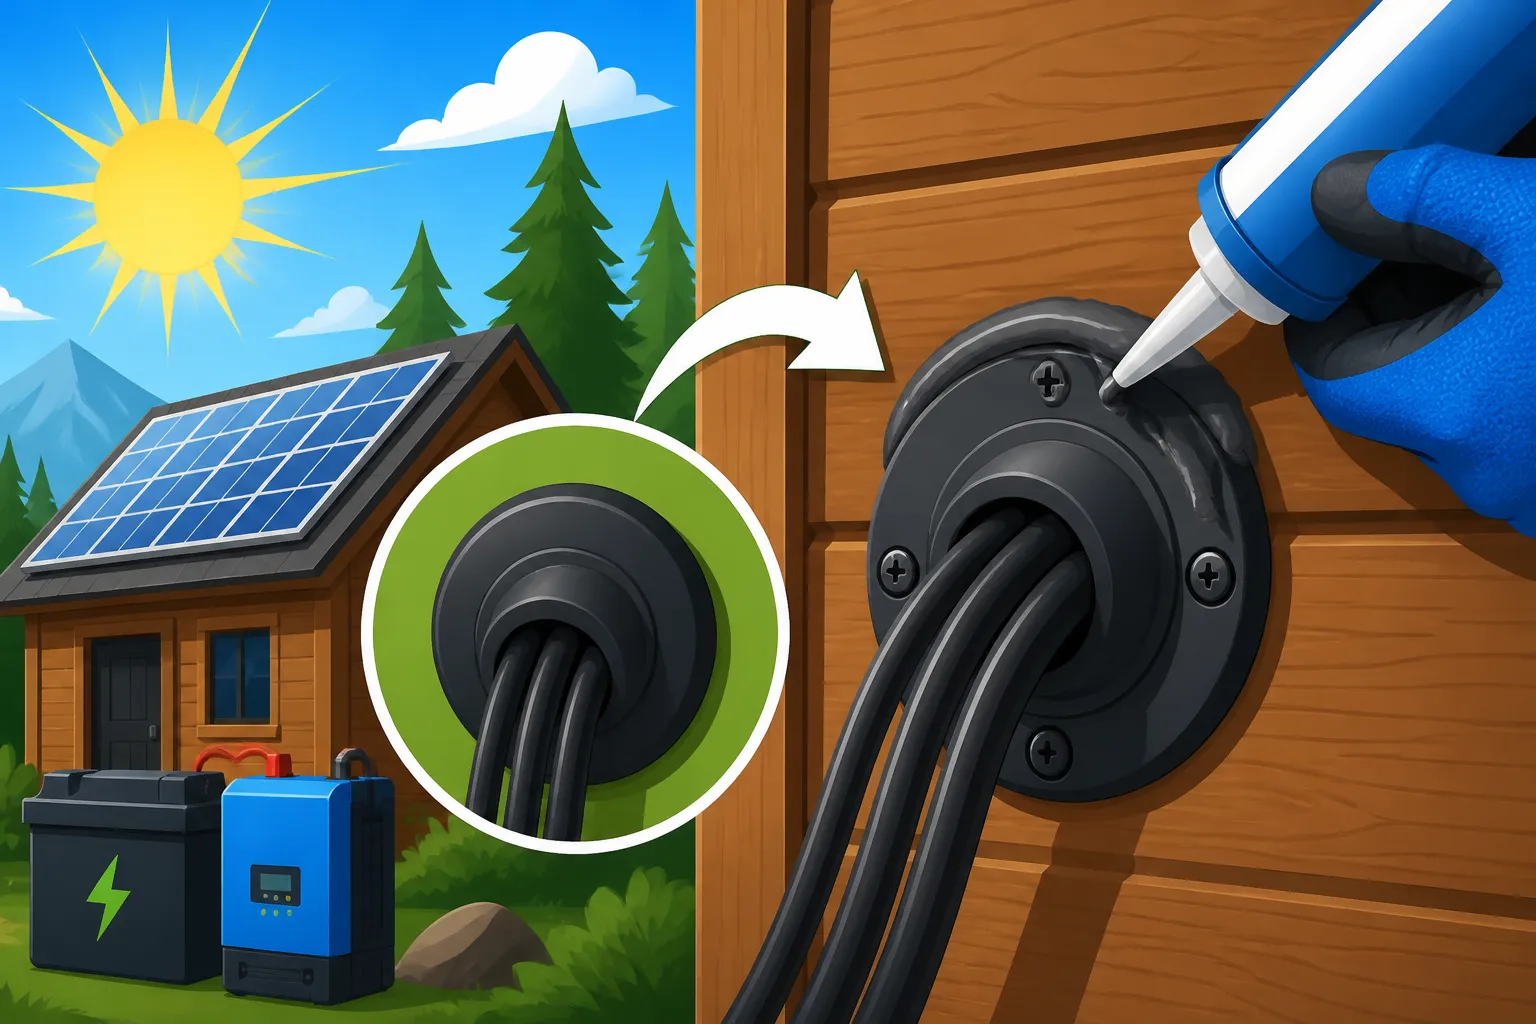
If you’re using a multi-cable entry gland, insert your solar cables through the internal rubber gaskets or compression fittings first. Ensure there's enough slack on both the interior and exterior sides to avoid tension on the cables. Position the gland over the prepared hole, making sure it sits flush against the cabin wall. For a robust seal against moisture and pests, apply a generous bead of butyl tape to the back of the entry gland, along its perimeter, before screwing it into place. This pliable tape will compress and fill any minor irregularities between the gland and the wall, providing an excellent initial seal.
Next, secure the gland to the cabin wall using appropriate screws. If you’re screwing into wood, make sure the screws are long enough to bite firmly. For other materials, you might need anchors. Don't overtighten, as this can crack the plastic or warp the gland, compromising the seal. Once secured, gently tighten the compression fittings around the cables on the gland itself. This creates a watertight seal directly around each individual cable. Remember, proper cable management is essential for safety and longevity, so consider how you’ll route your cables from here as detailed in our guide on How to Run Solar Cables Safely.
Applying Sealant for a Watertight Finish
With the physical entry plate in place, the final layer of protection comes from a high-quality, exterior-grade sealant. This step is about creating an impermeable barrier against all forms of intrusion.
Load your caulking gun with your chosen marine-grade silicone or polyurethane sealant. Starting at one point, apply a continuous, even bead of sealant around the entire perimeter of the cable entry gland where it meets the cabin wall. Don't be shy with the sealant, but avoid excessive globbing. The goal is a uniform, unbroken line that completely seals the joint. For extra protection, especially in areas prone to heavy rain, you can apply a second bead over the first, smoothing it out for a clean finish.
Immediately after applying the sealant, use a wet finger, a sealant tool, or even an ice cube (a classic trick!) to smooth the bead. This not only creates a professional appearance but also forces the sealant into any microscopic gaps, ensuring maximum adhesion and water resistance. Wipe away any excess sealant with a damp cloth or paper towel before it cures. Pay particular attention to the bottom edge of the gland, ensuring there's a good "drip edge" that will shed water away from the entry point. Once the exterior is done, head inside your cabin and apply a bead of sealant around the interior side of the cable entry as well, smoothing it out. This acts as a secondary vapor barrier and an extra deterrent for insects.
Inspecting and Maintaining the Seal
Your sealing job isn't a one-and-done forever task. Just like your entire Off-Grid Solar System Design Basics, it requires periodic inspection and maintenance to ensure it remains effective.
After the sealant has fully cured (check the manufacturer's recommendations for cure time, which can range from a few hours to a couple of days), perform a thorough visual inspection. Look for any gaps, cracks, or areas where the sealant might not have adhered properly. If you spot any imperfections, apply a small amount of fresh sealant to fill them. You might also want to perform a simple water test: gently spray water from a hose around the sealed entry point and check for any signs of leakage inside the cabin. This can expose weaknesses you missed visually.
Over time, environmental factors like UV exposure, temperature fluctuations, and structural movement of your cabin can cause sealants to degrade, crack, or pull away from surfaces. Make it a routine to inspect all your cable entries at least once a year, ideally in the spring after the winter freeze-thaw cycles. Look for visible cracks, peeling, or hardening of the sealant. If you notice any signs of degradation, it's much easier to clean out the old sealant and apply a fresh bead than to deal with water damage later. Think of it as part of your regular Off-Grid Solar Maintenance Costs – a little preventative care goes a long way.
Common Challenges and Troubleshooting Tips
Even with the best planning, off-grid installations often throw curveballs. Sealing cable entries is no different, especially when dealing with the unique characteristics of a cabin or older structure. Anticipating these challenges can help you tackle them effectively.
Dealing with Irregular Surfaces
Many cabins, especially those built with logs or rough-sawn lumber, don't have perfectly flat or smooth exterior surfaces. This can make achieving a watertight seal incredibly tricky. A standard flat cable entry plate might not sit flush, leaving gaps for water and pests.
When faced with irregular surfaces, don't despair! The key is flexibility and adaptability in your sealing materials. Start by using plenty of butyl tape under your cable entry gland. Its putty-like consistency allows it to conform beautifully to uneven surfaces, filling in depressions and creating a solid base layer. Apply a thicker layer of butyl tape than you might on a flat surface, pressing it firmly into the contours of the wood. For the final exterior sealant, opt for a high-quality polyurethane caulk, which often has superior adhesion and flexibility compared to standard silicones, allowing it to bridge minor gaps and tolerate structural movement without cracking. If the irregularity is significant, you might even consider carving out a small, flat section in the log or wood where the gland will sit, creating a smoother patch to seal against. This requires a bit more effort but can lead to a far more reliable seal.
Preventing Condensation Issues
It's not just rain and snow you need to worry about; condensation can be a silent enemy, especially inside the wall cavity around cable entries. When warm, humid interior air meets a cold exterior surface (or vice versa), moisture can form, even in seemingly sealed areas. This trapped moisture can lead to mold, rot, and corrosion of electrical components over time.
To prevent condensation, focus on creating an airtight seal both inside and outside the cabin, essentially sealing the wall cavity from air exchange. After running your cables through the wall, if there are any significant voids within the wall cavity that aren't occupied by cables, consider filling them with closed-cell expanding foam. This provides insulation and stops air movement. Ensure your interior sealant application is just as robust as your exterior one. Another tip is to bundle your cables together where they enter the cabin, if possible, rather than having them spaced widely. This creates a smaller overall opening to manage and insulate. For larger, more complex systems, learning How to Wire an Off-Grid Solar System properly, including conduit runs, can further mitigate condensation risks by protecting cables within a continuous pathway.
Long-Term Durability and Re-Sealing
No sealant lasts forever, especially when exposed to the relentless cycles of weather. Over time, UV radiation, extreme temperature fluctuations, and the natural expansion and contraction of your cabin's materials will cause even the best sealants to degrade. Ignoring this reality can lead to costly water damage or pest infestations down the line.
Plan for periodic inspection and re-sealing as part of your overall cabin and solar system maintenance. As mentioned earlier, conducting an annual inspection, perhaps in the spring, is a smart strategy. Look for any visible cracks, peeling, or areas where the sealant has lost its elasticity. Pay close attention to corners and edges, as these are often the first points of failure. When it's time to re-seal, don't just apply new caulk over the old, degraded material. Take the time to carefully remove as much of the old sealant as possible with a utility knife or scraper. Clean the surface thoroughly with denatured alcohol or acetone, and then apply fresh sealant as if it were a brand new installation. This ensures proper adhesion of the new material and extends the life of your weatherproof seal for years to come. Thinking about the full scope of upkeep, our guide on How to Maintain Off-Grid Solar Panels offers additional tips for the longevity of your entire setup.
Off-Grid Cable Entry Sealing Options Comparison
Choosing the right materials can make a significant difference in the effectiveness and longevity of your cable entry seals. Here's a quick comparison of common sealing components:
| Sealing Material/Method | Pros | Cons | Best Use Case |
|---|---|---|---|
| Cable Gland/Plate | Dedicated design, clean look, professional finish | Requires precise hole drilling, can be costly for many cables | Multi-cable entries, rigid walls (wood, metal) |
| Marine-Grade Silicone | Excellent UV resistance, flexible, good adhesion | Can be difficult to tool smoothly, needs clean surface | Exterior sealant, sealing gaps around rigid fixtures |
| Polyurethane Sealant | Stronger adhesion, very durable, paintable | Can be harder to work with, less UV-resistant than silicone | High-movement areas, strong exterior bonds |
| Butyl Tape | Highly pliable, excellent initial water barrier | Not UV stable on its own, messy to work with | Underneath cable entry plates, irregular surfaces |
| Closed-Cell Expanding Foam | Fills large voids, insulates, pest deterrent | Not UV stable, needs sealant over it, can be over-applied | Filling internal wall cavities around cables |
| Conduit with Seal | Ultimate protection, easy to add/remove cables | More complex installation, higher cost | Permanent structures, future expansion needs |
Disclaimer
The information provided in this guide is for general informational purposes only. While we strive to offer accurate and up-to-date advice, off-grid solar installation and electrical work can be complex and potentially dangerous. Always consult with a qualified electrician or solar professional before undertaking any electrical projects. Ensure you comply with all local building codes, electrical codes, and permitting requirements. Working with electricity carries inherent risks, and improper installation can lead to property damage, injury, or even death. Proceed with caution and at your own risk.