How to Size Off-Grid Solar for a Mini Split
Trying to power a mini-split air conditioner with off-grid solar can feel like a monumental task. You've probably heard horror stories about massive power drains and complicated setups, leading to doubts about whether it's even feasible without breaking the bank or constantly running out of juice. This guide will walk you through the precise steps to calculate and size an off-grid solar system specifically for your mini-split, ensuring you stay cool and comfortable without the grid.
Understanding Your Mini-Split’s Power Demands
Before you can even think about solar panels or batteries, you need to deeply understand the power requirements of your mini-split. This isn’t just about the number on the box; there are critical distinctions between how much power it *can* draw and how much it *actually* draws during operation. Getting this wrong is the quickest way to end up with an undersized system and a lot of frustration.
Decoding SEER and EER Ratings
When you look at a mini-split, you’ll see ratings like SEER (Seasonal Energy Efficiency Ratio) and EER (Energy Efficiency Ratio). These aren’t just marketing numbers; they are crucial indicators of how much electricity your unit will consume to cool a space. The higher the SEER or EER, the more efficiently the unit operates, meaning it uses less electricity for the same amount of cooling output. For off-grid living, efficiency is king! A mini-split with a SEER rating of 20 or higher, for instance, will draw significantly less power over a cooling season than one with a SEER of 14, directly translating to fewer solar panels and smaller battery banks.
Think of it this way: a higher SEER is like a car with better gas mileage. Both cars get you to your destination, but one uses less fuel to do it. On an off-grid system, every watt-hour saved is a watt-hour you don't need to generate or store, making your system more robust and cost-effective. Investing in a high-efficiency unit up front will drastically reduce your long-term solar costs and operational headaches.
Startup Surge Versus Running Watts
This is perhaps the most misunderstood aspect when sizing off-grid systems for motors and compressors, which mini-splits contain. Every time your mini-split’s compressor kicks on, it requires a significant burst of power, often 2-3 times its continuous running wattage, to overcome inertia. This is called the “startup surge” or “inrush current.” If your inverter isn’t capable of handling this momentary surge, it will trip or shut down, and your mini-split simply won’t start.
For example, a mini-split that continuously runs at 1,000 watts might have a startup surge of 2,500 to 3,000 watts for a few milliseconds. Your inverter must be rated to handle this peak. Most inverters specify both a continuous power rating and a surge power rating (usually for a short duration like 20 milliseconds to 2 seconds). Always check your specific mini-split's manual or nameplate for its actual running watts and, if possible, its Locked Rotor Amps (LRA) or startup wattage. If you can't find exact numbers, it's safer to assume a surge factor of 2.5 to 3 times the running wattage. This vital detail is often where DIYers go wrong, ending up with an inverter that can power everything else but chokes when the AC tries to start.
Factors Affecting Mini-Split Consumption
It’s not just about the mini-split itself; its operating environment plays a huge role in its actual power draw.
* **Insulation and Air Sealing**: A well-insulated home or RV with properly sealed windows and doors will require far less cooling than a poorly insulated structure. If you’re running a mini-split in a leaky old cabin or an RV with minimal insulation, your unit will constantly work harder, drawing more power and draining your batteries faster. Before investing heavily in solar, invest in insulation!
* **Climate and Outdoor Temperature**: Naturally, a mini-split running in Arizona in July will consume more power than the same unit in Oregon in September. The difference between your desired indoor temperature and the ambient outdoor temperature dictates how hard the compressor has to work.
* **Thermostat Settings and Usage Patterns**: Do you run your mini-split 24/7 or just a few hours in the evening? Do you set it to a chilly 68°F or a more moderate 75°F? Every degree, and every hour of operation, adds to your total daily energy consumption. Be realistic about your usage habits. If you plan to blast the AC all day, your solar system needs to be significantly larger than if you only use it for a couple of hours before bed.
* **Shading and Window Orientation**: Direct sunlight streaming through windows can rapidly heat a space, forcing the mini-split to work harder. External shading, window films, or even thick curtains can make a surprising difference in reducing heat gain and, consequently, power consumption.
Calculating Your Daily Energy Needs
This is where we put numbers to your mini-split usage. Getting this step right is foundational; every other component in your off-grid solar system hinges on an accurate understanding of your daily energy consumption. Don’t rush this part!
Estimating Daily Watt-Hours
To size your system correctly, you need to determine the total watt-hours (Wh) your mini-split will consume in a typical 24-hour period. This involves knowing its running wattage and how many hours you plan to use it.
Here’s a step-by-step example:
- Find the running wattage: Let’s assume your mini-split’s specifications list a running wattage of 900 watts (W) for cooling. Remember, this is the continuous draw after startup.
- Estimate daily operating hours: This is where you need to be honest with yourself. In the peak of summer, you might run it for 8 hours a day. But realistically, the compressor won't run continuously for 8 hours. It will cycle on and off as it maintains the temperature. A common way to estimate this is to assume the compressor runs for about 60-75% of the total "on" time in a well-insulated space. Let's say you want to cool for 8 hours, and the compressor runs for 75% of that time. That's 6 hours of actual compressor run time.
- Calculate daily watt-hours:
- Running Watts x Actual Compressor Run Hours = Daily Watt-Hours
- 900 W x 6 hours = 5,400 Wh per day.
This 5,400 Wh is your target. This number dictates how large your battery bank needs to be and how many solar panels you'll require to replenish that energy daily. It's often helpful to measure this directly if you can, using a Kill-A-Watt meter for a typical appliance or an energy monitor for your whole home. For more detailed guidance on calculating all your loads, you might want to check out our guide on How to Calculate Daily Energy Usage.
Accounting for Seasonal Variations
The beauty of off-grid solar is its adaptability, but this also means acknowledging that your energy needs aren’t static throughout the year. Your mini-split usage, in particular, will vary significantly with the seasons.
- Summer Peak: In hotter months, your mini-split will likely be your biggest energy hog. You'll probably run it for more hours, and the compressor will cycle more frequently due to higher ambient temperatures. Your system should ideally be sized for this peak demand to avoid discomfort. This means your battery bank needs to be large enough to handle several consecutive hot days, and your solar array powerful enough to recharge it even if some of those days are hazy.
- Shoulder Seasons (Spring/Fall): During spring and fall, your mini-split might see less use for cooling, or perhaps you'll use its heating function (which typically draws more power than cooling). Your daily watt-hour consumption for the mini-split will drop considerably, meaning your solar system will likely have an abundance of power, allowing your batteries to stay fully topped off.
- Winter Considerations: If your mini-split also provides heat (a heat pump mini-split), its electrical consumption for heating can be substantially higher than for cooling, especially in colder climates. Heat pumps are efficient, but when outdoor temperatures drop significantly, their electrical resistance heating elements might kick in, consuming a lot of power. If you plan to heat with your mini-split, you must perform a separate, higher load calculation for winter heating. For year-round off-grid power, you'll need to consider How to Design for Year-Round Off-Grid Power.
It's usually best to size your system for your highest projected daily usage, which is often peak summer cooling, or if applicable, peak winter heating. This ensures you have enough power when you need it most.
Sizing Your Off-Grid Components for a Mini-Split
Now that you know your mini-split’s power appetite, it’s time to gather the pieces of your solar puzzle. Each component needs to be perfectly matched to handle the unique demands of an off-grid air conditioning unit.
Choosing the Right Inverter
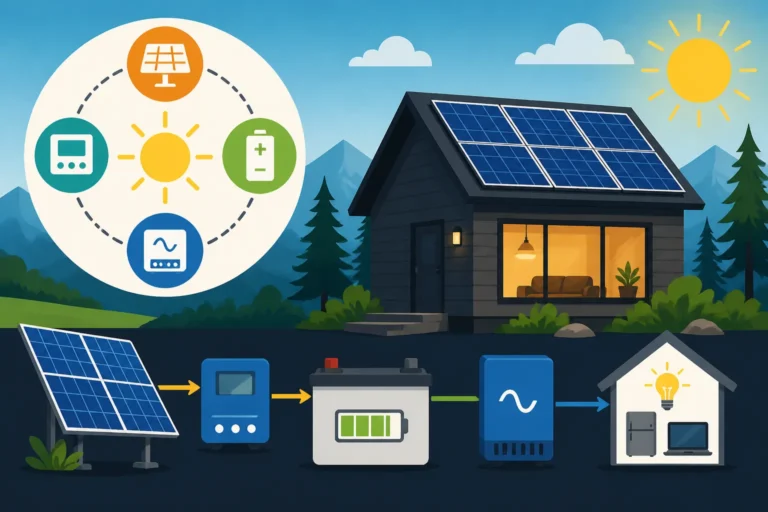
The inverter is the heart of your AC system, converting the DC power from your batteries into the AC power your mini-split needs. For a mini-split, you absolutely need a **pure sine wave inverter**. Modified sine wave inverters are cheaper but can damage sensitive electronics and will almost certainly cause issues with the compressor motor in your mini-split, leading to inefficiency and premature failure.
When choosing an inverter, remember the startup surge. If your mini-split runs at 900W and has a 2.5x surge factor, it needs an inverter that can momentarily handle 2,250W. I'd recommend oversizing slightly. A 3,000W pure sine wave inverter with a surge rating of 6,000W for a few seconds would be a good starting point for our example 900W mini-split. Brands like Victron Energy or Outback Power are well-regarded for their robust inverters with excellent surge capabilities, though you might find more budget-friendly options that still fit the bill from brands like Renogy or even on Amazon if you meticulously check specifications and reviews. Look for units that clearly state their surge capacity and duration.
Consider an inverter-charger if you plan to integrate a generator for backup power, which is often a wise choice for high-draw appliances like mini-splits, especially during extended cloudy periods. You can learn more about What Size Inverter to Run An Air Conditioner for various scenarios.
Determining Battery Bank Capacity
Your battery bank stores the energy generated by your solar panels for your mini-split to use, especially when the sun isn’t shining. Sizing it involves two main factors: your daily energy consumption and your desired “days of autonomy” (how many days your system can run without sun).
Using our example of 5,400 Wh per day:
- Decide on Days of Autonomy: For a mini-split, especially if you live in a region with frequent cloudy weather, 2-3 days of autonomy is a sensible minimum. Let’s aim for 2 days.
- Total Watt-Hours Needed: 5,400 Wh/day * 2 days = 10,800 Wh.
- Choose Battery Voltage: For systems powering high-wattage appliances like mini-splits, a 24V or 48V system is highly recommended. Higher voltage systems are more efficient, reduce wire thickness requirements, and are generally more scalable. Let's assume a 48V system.
- Calculate Amp-Hours (Ah) Needed: Ah = Total Wh / System Voltage
- 10,800 Wh / 48V = 225 Ah.
Now, this 225 Ah is the usable capacity. If you're using LiFePO4 (lithium iron phosphate) batteries, you can typically use 80-100% of their rated capacity. For lead-acid (AGM or flooded), you should only discharge them to 50% to maximize their lifespan. So, for lead-acid, you'd need double the calculated Ah (450 Ah). For LiFePO4, 225 Ah at 48V is a good starting point. This often means multiple individual batteries wired in series or parallel. For example, you might use 4x 100Ah 12V LiFePO4 batteries wired in series to get a 48V 100Ah bank, which would give you 4800Wh, so you'd need at least 2 or 3 of these sets, depending on your actual 48V battery size.
Battery chemistry also plays a huge role. LiFePO4 vs Lead-Acid Battery Cost is an important consideration, as lithium batteries offer higher usable capacity, longer lifespan, and faster charging, making them ideal for mini-split demands despite a higher upfront cost.
Sizing the Solar Panel Array
Your solar panels are responsible for generating electricity to run your mini-split (if it’s daytime and sunny) and, more importantly, recharging your battery bank.
Using our example of 5,400 Wh/day for the mini-split (plus some general home loads, let's say another 1,000 Wh for lights, fridge, etc., bringing the total to 6,400 Wh/day) and a 48V 225 Ah battery bank:
- Account for System Losses: No system is 100% efficient. You'll lose power due to wiring, inverter inefficiency, battery charging losses, dust on panels, etc. A common estimate for total system losses is 20-30%. Let's use 25%.
- Total Daily Wh Needed (including losses) = 6,400 Wh / 0.75 = 8,533 Wh.
- Determine Peak Sun Hours (PSH): This is the average number of hours per day your location receives direct sunlight equivalent to 1,000 watts per square meter (standard test conditions). This varies greatly by location and season. You can find this data online from sources like the National Renewable Energy Laboratory (NREL). Let’s assume you have 4.5 PSH in your least sunny month when you still need AC. You might also want to explore Peak Sun Hours Explained for a deeper dive.
- Calculate Required Solar Array Size (in Watts):
- Required Panel Watts = Total Daily Wh Needed / Peak Sun Hours
- 8,533 Wh / 4.5 PSH = 1,896 Watts.
So, you would need roughly 1,900 watts of solar panels. If you're using 400W solar panels, you'd need 1,900 / 400 = 4.75, so 5 panels. This is a substantial array, illustrating the power demands of a mini-split. You can often find quality solar panels from brands like Renogy or other reputable manufacturers on platforms like Amazon.
Selecting a Charge Controller
The charge controller sits between your solar panels and your batteries, regulating the voltage and current to safely and efficiently charge your battery bank. For a system of this size, especially with multiple panels and a 48V battery bank, an **MPPT (Maximum Power Point Tracking) charge controller** is essential.
- MPPT vs. PWM: PWM (Pulse Width Modulation) controllers are cheaper but less efficient, wasting a significant amount of power, especially with large voltage differences between panels and batteries. MPPT controllers are more expensive but can be up to 30% more efficient, particularly in cooler temperatures or with varying light conditions, by actively tracking the optimal power point of your solar array. This extra efficiency translates directly into more usable power for your mini-split. You can explore the differences in more detail in our article on MPPT vs PWM Charge Controllers.
- Sizing the MPPT Controller: The charge controller needs to be sized based on the total wattage of your solar array and your battery bank voltage.
- Maximum Amps from Panels = Total Panel Watts / (Panel Vmp x 0.8) for a conservative estimate or look at your panel's short circuit current (Isc).
- Max Amps (approx) = (Total Panel Watts / Battery Voltage) * 1.25 (for safety margin)
- Using our 1,900W array and a 48V battery bank: (1,900 W / 48V) * 1.25 = 39.58 A * 1.25 = ~49.5 Amps.
- So, a 50A MPPT charge controller for a 48V system would be appropriate. Brands like Victron, MidNite Solar, and Renogy offer excellent MPPT controllers that can handle these loads. Always ensure the controller's maximum PV input voltage is higher than your panel array's open-circuit voltage (Voc) to prevent damage.
| Component | Calculation Basis | Example (900W Mini-Split, 6 hrs/day, 2 Days Autonomy, 4.5 PSH) | Example Component Specs |
|---|---|---|---|
| Mini-Split | Running Watts, Startup Surge, Daily Usage | Running: 900W, Surge: ~2250W, Daily Usage: 5400 Wh | High SEER (20+), Pure Sine Wave compatible |
| Inverter | Mini-Split Running Watts + Surge | Continuous: 900W, Surge: 2250W. Recommended: ~3000W continuous, 6000W surge | Pure Sine Wave, 3000W / 6000W surge |
| Battery Bank | Total Daily Wh Needed (w/ losses), Days of Autonomy, System Voltage | (5400 Wh + 1000 Wh general loads) / 0.75 loss = 8533 Wh daily. 2 days autonomy = 17066 Wh total. At 48V = 355 Ah usable. | 48V, ~360 Ah LiFePO4 (e.g., 4 x 100Ah 48V batteries or 16 x 100Ah 12V in 4s4p) |
| Solar Panels | Total Daily Wh Needed (w/ losses), Peak Sun Hours | 8533 Wh / 4.5 PSH = 1896 W | 1900W total (e.g., 5 x 400W panels) |
| Charge Controller | Total Panel Watts, Battery Voltage | ~1900W panels, 48V battery. (1900W / 48V) * 1.25 = ~50A | MPPT, 50A, 48V compatible |
Real-World Considerations and Best Practices
Once you’ve got your head wrapped around the technical sizing, it’s time to layer in some practical, real-world advice. Going off-grid with a mini-split isn’t just about components; it’s about smart energy management and strategic planning.
Energy Efficiency Strategies
The less power your mini-split uses, the smaller and more affordable your off-grid solar system needs to be. This is a foundational principle for any off-grid setup, but it’s absolutely critical when dealing with a high-draw appliance like a mini-split.
- Insulation is Your Best Friend: We talked about this earlier, but it bears repeating. Before you spend thousands on solar equipment, ensure your dwelling is as airtight and well-insulated as possible. Seal cracks, upgrade windows, add insulation to walls and ceilings. This reduces the workload on your mini-split, making your solar system far more effective and efficient. This alone can cut your cooling (or heating) energy demands by 30-50%.
- Smart Thermostat Usage: Don't blast the AC to arctic temperatures. Every degree you raise your thermostat in summer saves energy. Aim for a comfortable but not excessive temperature, perhaps 75-78°F (24-26°C). Use the "fan only" mode when just air circulation is needed. Consider using a programmable thermostat to pre-cool before you arrive home or turn it off during periods when no one is around.
- Passive Cooling Techniques: Maximize natural ventilation. Open windows at night when it's cooler, then close them and draw blinds or curtains during the day to block out solar gain. Plant shade trees on the south and west sides of your dwelling. These seemingly simple actions significantly reduce the need for active cooling.
- Regular Maintenance: Clean your mini-split's filters monthly. Dirty filters restrict airflow, making the unit work harder and consume more power. Have the outdoor unit coils cleaned annually by a professional if possible, as dirty coils also reduce efficiency.
The Importance of Oversizing and Expansion
While the calculations give you a baseline, real-world conditions are rarely ideal. Oversizing your system slightly can provide a crucial buffer.
- Dealing with Cloudy Days: Even with decent days of autonomy, a string of exceptionally cloudy or rainy days can deplete batteries faster than expected. An oversized solar array (e.g., 20-30% more panels than the calculation suggests) can help compensate for less-than-ideal sun conditions, ensuring your batteries get a full charge even on hazy days.
- Future Needs: Your energy needs might grow. You might add another appliance, or decide you want to run the mini-split for longer hours. Designing an expandable system from the start – perhaps by choosing an inverter and charge controller with higher capacity than your initial needs, and leaving space for more panels or batteries – can save you significant money and hassle down the road. Our guide on How to Design an Expandable System offers valuable insights.
- Battery Longevity: Forcing your batteries to operate at their limits daily can shorten their lifespan. A slightly larger battery bank means less deep cycling, which is particularly beneficial for lead-acid batteries and can extend the life of LiFePO4 batteries too.
- Seasonal Tilt and Orientation: Consider adjustable mounts for your solar panels. Changing the tilt angle to match the sun's seasonal path can significantly increase energy harvest, especially in winter when the sun is lower in the sky.
Budgeting and Component Sourcing
Going off-grid with a mini-split is an investment. It’s crucial to budget wisely and know where to source reliable components.
- Upfront Costs: Expect to invest a significant amount. A system capable of running a mini-split will likely be in the range of several thousand dollars, potentially even tens of thousands for a robust whole-home setup. Don't underestimate the Cost of an Off-Grid Solar System when factoring in all the components.
- Component Quality: While it might be tempting to opt for the cheapest components, remember that reliability is paramount in an off-grid system. A failing inverter or battery can leave you without power when you need it most. Research reputable brands. For instance, Victron Energy, Outback Power, and MidNite Solar are known for their high-quality inverters and charge controllers. For solar panels, brands like Renogy, REC Solar, and Canadian Solar are solid choices. While you might find deals on Amazon, especially for smaller components or Renogy kits, always verify seller reputation and warranty information.
- DIY vs. Professional Installation: You can save a lot by doing a DIY installation, but only if you have the necessary electrical knowledge and are comfortable with the complexity involved. Wiring an off-grid system, especially a higher voltage one, requires careful attention to safety and code compliance. If you're unsure, consider hiring an electrician for the trickier parts or getting a professional to review your design and connections. There's a lot to consider in DIY vs Professional Off-Grid Solar Cost.
- Start Small, Expand Later: If the upfront cost is daunting, consider phasing your off-grid build. Start with essential loads and a smaller solar array, then expand as your budget allows and your needs grow. This is perfectly achievable if your initial inverter and charge controller are chosen with future expansion in mind. You might find our guide on How to Phase an Off-Grid Solar Build to Spread Cost very helpful.
- Check for Incentives: While off-grid systems sometimes have fewer direct incentives than grid-tied ones, it's worth checking for any local or state programs that might apply, or if components like solar batteries qualify for any federal tax credits. Our article on Does the Federal Tax Credit Apply to Off-Grid Solar has more details.
By carefully planning, understanding your mini-split's actual power needs, and making smart choices about your components and energy habits, you absolutely can run a mini-split reliably off-grid. It requires a significant initial investment and diligent management, but the comfort and energy independence are often well worth the effort.
Disclaimer
Please remember that the information provided in this guide is for educational and informational purposes only. Off-grid solar system design and installation can be complex and involve high voltage electricity, which can be dangerous. Always consult with qualified professionals and adhere to all local electrical codes and regulations. Incorrect installation or sizing can lead to property damage, injury, or fire.