How to Wire Batteries in Series and Parallel
Navigating the world of off-grid solar can feel like learning a whole new language, and figuring out how to connect your batteries is often one of the trickiest parts. It’s easy to feel overwhelmed by the diagrams, the talk of volts and amps, and the nagging fear of making a costly mistake. But don't worry, you’re not alone in this! This comprehensive guide will walk you through the ins and outs of wiring batteries in series and parallel, ensuring you understand the why and the how for a safe and efficient off-grid power system.
Understanding the Basics: Why Wiring Matters
When you’re setting up an off-grid solar system, your battery bank is the heart of your power storage. It's where all that glorious sunshine gets tucked away for later use, especially on those cloudy days or long nights. But simply having batteries isn't enough; how you connect them profoundly impacts their performance, longevity, and even the safety of your entire system. Get it wrong, and you could damage your equipment, reduce your battery lifespan, or even create a fire hazard.
The Core Goal: Matching Voltage and Capacity
The fundamental reason we wire batteries in specific ways is to achieve the desired voltage and capacity for our off-grid setup. Most solar panels output a certain voltage, and your inverter, which converts DC battery power to AC household power, operates at a specific input voltage (commonly 12V, 24V, or 48V). Your appliances, too, have particular power demands. Your battery bank needs to be sized and configured to meet these requirements.
Imagine trying to run a 24-volt washing machine with only a 12-volt battery; it just won't work efficiently, if at all. Similarly, if you need to store a lot of energy to power your cabin through several cloudy days, you'll need a significant amount of "capacity." Wiring your batteries correctly ensures that your solar panels can charge them effectively, your inverter can draw power reliably, and your appliances receive the right amount of juice without overworking any component. Without this foundational understanding, you're essentially guessing, and that's not a path to reliable off-grid living. For a deeper dive into overall planning, check out our guide on how to size an off-grid solar system.
Essential Terminology for Off-Grid Battery Wiring
Before we jump into the nitty-gritty of connecting wires, let's clear up some key terms. These aren't just technical jargon; they're the building blocks of understanding your system.
- Voltage (V): Think of voltage as the "pressure" or "force" of electricity. A higher voltage means more electrical "push." Batteries come in various voltages (e.g., 6V, 12V).
- Amperage (A) / Current: This is the "flow" or "rate" of electricity. Higher amperage means more electrons are moving through the circuit.
- Amp-hours (Ah): This measures a battery's capacity – how much energy it can deliver over time. A 100Ah battery can theoretically deliver 100 amps for one hour, or 10 amps for 10 hours.
- Watt-hours (Wh): This is the total amount of energy stored or consumed. It's calculated by Voltage x Amp-hours. If you have a 12V, 100Ah battery, it stores 1200Wh. This is often the most practical way to think about your total energy needs, and understanding how many watt-hours you use per day is crucial.
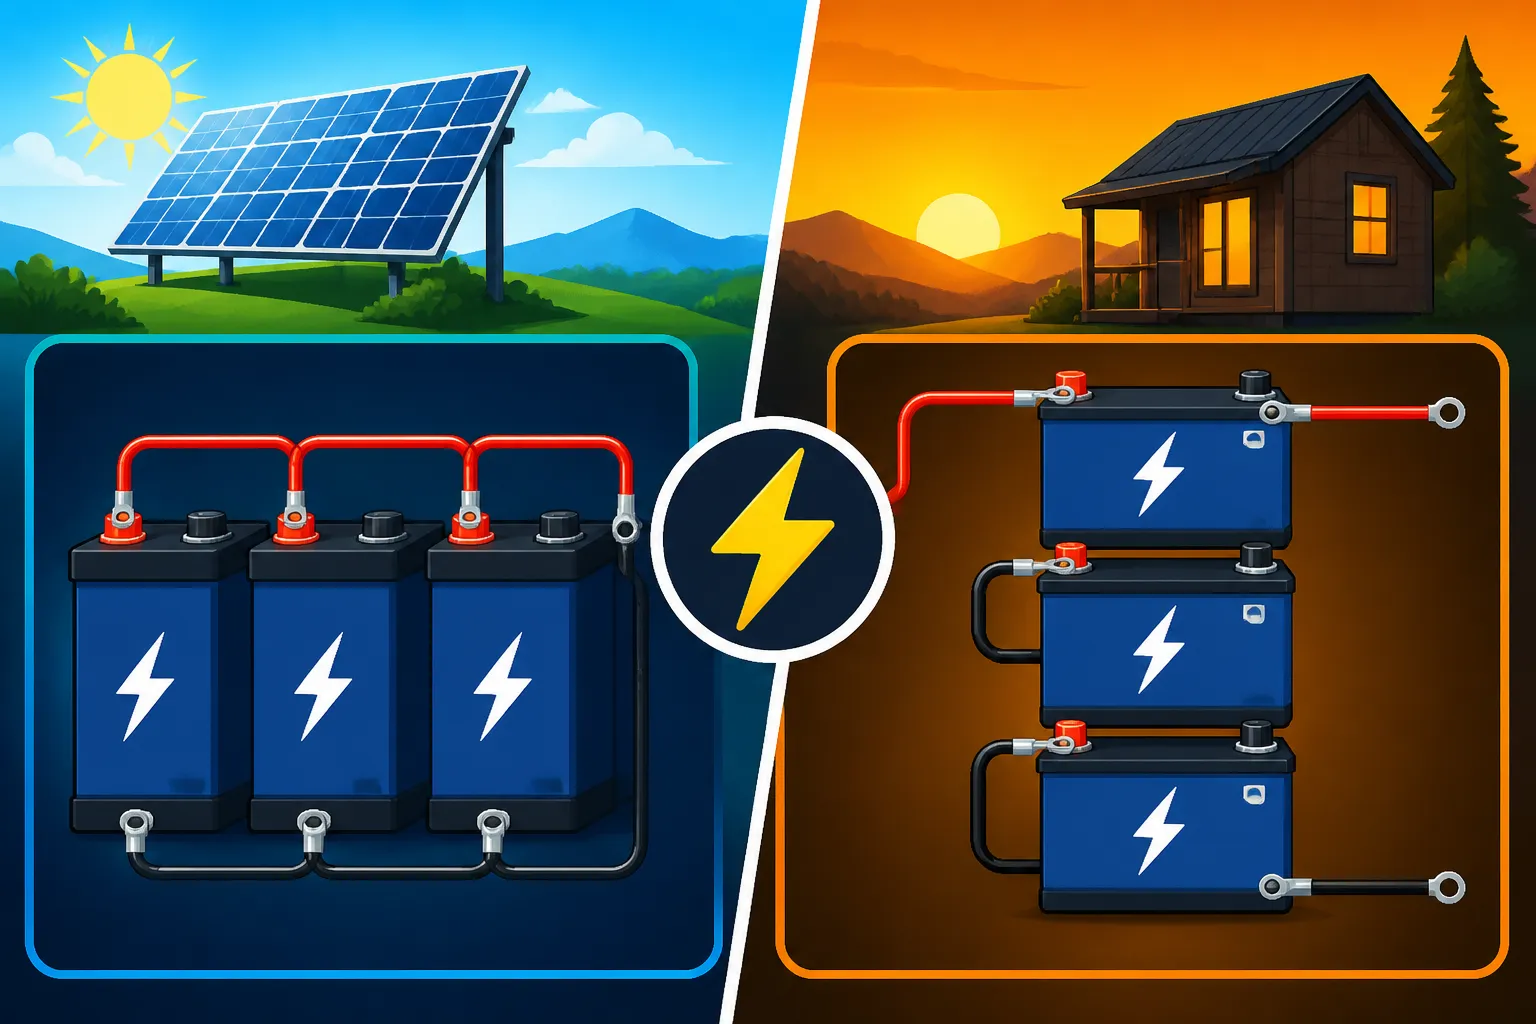
- Series Connection: This involves connecting the positive terminal of one battery to the negative terminal of the next. It increases the total voltage of the battery bank while keeping the amp-hour capacity the same.
- Parallel Connection: This involves connecting positive terminals together and negative terminals together. It increases the total amp-hour capacity of the battery bank while keeping the voltage the same.
- Series-Parallel Connection: A combination of both, used to achieve both higher voltage and higher capacity simultaneously, often found in larger off-grid setups.
Getting comfortable with these terms will make all the wiring diagrams and explanations much clearer.
Wiring Batteries in Series: Increasing Voltage
Alright, let's talk about series wiring. This is your go-to method when you have individual batteries that provide a lower voltage than what your off-grid system requires. For example, if you have several 12-volt batteries but your inverter needs a 24-volt or even a 48-volt input, series wiring is how you bridge that gap. It's pretty straightforward once you get the hang of it, but precision and safety are key.
Step-by-Step Series Connection
Connecting batteries in series is like stacking building blocks to reach a higher height. You're adding up the voltages.
- Gather Your Batteries: Let's say you have two 12V batteries and you want to create a 24V bank.
- Identify Terminals: Each battery will have a positive (+) terminal and a negative (-) terminal. They're usually clearly marked, sometimes even color-coded (red for positive, black for negative).
- Connect Negative to Positive: Take a heavy-gauge battery cable. Connect the negative terminal of the first battery to the positive terminal of the second battery. This is the crucial link that creates the series connection.
- Identify System Terminals: Now, the unused positive terminal of the first battery and the unused negative terminal of the second battery become your main positive and negative terminals for the entire 24V battery bank.
- Expand for Higher Voltage (Optional): If you needed 48V, you'd add two more 12V batteries. You'd connect the negative of the second battery to the positive of the third, and the negative of the third to the positive of the fourth. The system's positive would be the first battery's positive, and the system's negative would be the fourth battery's negative.
Example:
- Battery 1 (12V) -> Connect its (-) to Battery 2's (+)
- Battery 2 (12V) -> Now you have 24V.
Important Considerations:
- Cable Sizing: Always use appropriately sized battery cables. Thicker cables (lower AWG number) can handle more current with less resistance and heat. If you use thin cables, you risk voltage drop and overheating. A good rule of thumb is to size cables for the maximum expected current draw, plus a safety margin.
- Fusing and Disconnects: While technically the system's main fuse and disconnect will protect the entire bank, it's good practice to consider individual battery fusing in larger banks, especially for parallel strings, which we'll discuss next. For any battery bank, a master fuse and disconnect switch are absolutely critical between the bank and your inverter/charge controller. You can find robust DC circuit breakers and fuse blocks from brands like Renogy or readily available on Amazon. For guidance on appropriate wiring and safety devices, check out our article on how to size wire and cables.
When to Use Series Wiring
Series wiring isn't just a random choice; it serves specific purposes in an off-grid solar system.
- Higher System Voltage: This is the most common reason. Many charge controllers and inverters are designed to operate at 24V or 48V. Using a higher system voltage offers significant advantages, especially for larger setups. For instance, a 48V system requires half the current of a 24V system for the same amount of power. Less current means you can use thinner, less expensive cables, and experience less voltage drop over long distances. This becomes particularly important when you're sizing solar for a well pump, which can draw substantial power.
- Inverter Compatibility: Most powerful inverters, especially those for whole-house off-grid living, operate most efficiently at higher DC input voltages (24V or 48V). Trying to run a large inverter off a 12V bank would require massive, incredibly expensive cables and could even exceed the inverter's input current limits.
- Matching Charge Controller Output: Your MPPT charge controller will typically output a charge voltage that matches your battery bank voltage. By wiring your batteries in series, you configure them to accept this higher voltage, ensuring efficient charging.
- No Change in Amp-Hours: Remember, when you wire in series, your total amp-hour capacity stays the same as a single battery in the series string. So, two 12V 100Ah batteries in series give you a 24V 100Ah bank (2400Wh). If you need more storage, you'll also need parallel connections.
Wiring Batteries in Parallel: Increasing Capacity
Once you've got the hang of increasing voltage with series connections, increasing capacity with parallel wiring is the next logical step. This is where you gain more usable energy storage, allowing your off-grid system to power your devices for longer periods or handle heavier loads. It's like adding more lanes to a highway – the voltage (speed limit) stays the same, but more cars (amps) can flow through.
Step-by-Step Parallel Connection
Connecting batteries in parallel adds their amp-hour capacities together while keeping the voltage of the bank consistent with the individual battery voltage.
- Start with Matching Batteries: For parallel connections, it's absolutely crucial that all batteries are of the same voltage, type, age, and capacity. Mixing and matching here can lead to uneven charging, premature battery degradation, and safety issues. For example, use two 12V 100Ah batteries.
- Identify Terminals: As before, locate the positive (+) and negative (-) terminals on each battery.
- Connect Positive to Positive: Take a heavy-gauge battery cable and connect the positive terminal of the first battery to the positive terminal of the second battery.
- Connect Negative to Negative: Take another heavy-gauge battery cable and connect the negative terminal of the first battery to the negative terminal of the second battery.
- Identify System Terminals: Now, either of the connected positive terminals can serve as your main positive output, and either of the connected negative terminals can serve as your main negative output for the entire battery bank. The voltage will still be 12V, but your capacity will be 200Ah (100Ah + 100Ah).
Example:
- Battery 1 (12V 100Ah) -> Connect its (+) to Battery 2's (+)
- Battery 1 (12V 100Ah) -> Connect its (-) to Battery 2's (-)
- Result: 12V 200Ah bank.
Critical Considerations for Parallel Wiring:
- Balanced Cable Lengths: This is SUPER important for parallel connections. Use cables of identical length and gauge for all parallel connections. If cables are uneven, the path of least resistance will cause one battery to take on more of the load (and charging current), leading to imbalances and premature failure.
- Fusing for Each String: In a large parallel bank, it's highly recommended to fuse each parallel string individually. If one battery short-circuits, it won't take the entire bank down or cause a catastrophic overcurrent from the other batteries. A properly sized fuse or breaker on each positive connection to the main busbar is a smart investment.
- Busbars: For cleaner, safer, and more efficient parallel connections, consider using busbars. These are metal strips (copper or brass) with multiple terminals where you can connect all your positive leads and all your negative leads, rather than daisy-chaining directly from battery to battery. They help ensure even current distribution. Many off-grid battery manufacturers like Battle Born Batteries design their systems with ease of parallel connection in mind.
When to Use Parallel Wiring
Parallel wiring is ideal for situations where you need to store more energy without changing your system's voltage.
- Increased Amp-Hour Capacity: This is the primary benefit. More amp-hours mean you can power your loads for a longer duration, crucial for extended off-grid stays or if you have high daily energy consumption. For example, if you're running a refrigerator on off-grid solar, you'll definitely need ample battery capacity to keep it running overnight and through cloudy spells.
- Meeting Daily Energy Needs: If your daily energy usage calculations show you need, say, 400Ah at 12V, and your individual batteries are 100Ah, you’ll need four of them wired in parallel to meet that capacity.
- Lower Voltage Systems: Parallel wiring is often seen in 12V systems common in RVs, vans, or smaller cabins where the power demands aren't as extreme, or where existing DC appliances are 12V. You can easily expand your 12V storage without needing to upgrade your charge controller or inverter to a higher voltage. For more details specific to RVs, check out how to size an off-grid system for an RV.
- Expandability: Parallel connections make it easier to expand your battery bank in the future. As long as you add identical batteries and maintain balanced cable lengths, you can simply add more parallel strings to increase your overall capacity.
Combining Series and Parallel: The Series-Parallel Bank
For many comprehensive off-grid solar setups, especially those powering homes or larger cabins, a simple series or parallel connection won't cut it. You'll likely need both higher voltage (for efficiency) and increased capacity (for ample storage). This is where the series-parallel battery bank comes into play, creating a robust system capable of handling substantial power demands.
Building a Larger, More Robust System
A series-parallel configuration allows you to multiply both your voltage and your amp-hour capacity. It's essentially creating smaller series strings first, and then connecting those strings in parallel. This is how you might build a 48V system with hundreds of amp-hours from individual 12V or 6V batteries.
Let's illustrate with an example: building a 24V 200Ah battery bank using four 12V 100Ah batteries.
- Form Series Strings:
- Take two 12V 100Ah batteries. Wire them in series: connect the negative of the first battery to the positive of the second. This creates a 24V 100Ah "string."
- Repeat this process with the other two 12V 100Ah batteries to create a second identical 24V 100Ah string.
- Connect Strings in Parallel:
- Now you have two independent 24V 100Ah strings.
- Connect the positive output of the first string to the positive output of the second string using a heavy-gauge cable (or better yet, a busbar).
- Connect the negative output of the first string to the negative output of the second string, again with an identical heavy-gauge cable (or busbar).
- Result: You now have a 24V battery bank with a total capacity of 200Ah (100Ah + 100Ah).
Another Common Scenario: 48V System from 6V Batteries
For very large banks, 6V batteries (often golf cart batteries) are popular due to their robust design and cost-effectiveness. To get a 48V bank from 6V 200Ah batteries:
- Create 48V Series Strings: You'd need 8 x 6V batteries per string (6V x 8 = 48V). Connect them in series.
- Parallel These Strings: If you needed more capacity, you would then build another identical 48V series string and connect these two 48V strings in parallel.
This method gives you the best of both worlds: high voltage for efficiency and expanded amp-hour capacity for robust storage. Knowing how many batteries for an off-grid system of this scale is crucial for planning.
Best Practices for Mixed Configurations
When you're dealing with series-parallel configurations, the stakes for proper wiring and maintenance go up. Following these best practices will help ensure a long, healthy life for your battery bank.
- Identical Batteries Only: This cannot be stressed enough. Every single battery in your series-parallel bank must be identical in brand, model, chemistry, capacity (Ah), and age. Mixing new with old, or different capacities, is a recipe for disaster. The weaker batteries will drag down the stronger ones, leading to premature failure and inefficient charging/discharging.
- Symmetrical Wiring and Cable Lengths: Just as with parallel connections, maintaining identical cable lengths and gauges for all connections within parallel strings is paramount. For a series-parallel setup, aim for symmetry. This helps ensure that each series string charges and discharges evenly. An unbalanced setup will lead to certain strings or individual batteries working harder than others, shortening their lifespan. Think of a well-organized electrical panel where everything is neat and purposefully laid out.
- High-Quality Components: Don't skimp on battery cables, terminals, busbars, fuses, or breakers. These components are carrying significant current, and cheap ones can lead to resistance, heat, and fire hazards. Brands like Renogy and others available on Amazon offer reliable cables and connection hardware.
- Battery Management Systems (BMS): If you're using lithium iron phosphate (LiFePO4) batteries, a robust Battery Management System (BMS) is non-negotiable. A good BMS will monitor individual cell voltages, balance the cells, protect against overcharge, over-discharge, overcurrent, and extreme temperatures. While lead-acid batteries benefit from careful monitoring and occasional manual balancing, a BMS is built-in protection for lithium. Understanding the advantages of LiFePO4 vs Lead-Acid battery cost can help you decide which is best for your system.
- Regular Monitoring: Even with a BMS, regularly check your battery bank's overall voltage and, if possible, individual battery voltages (or string voltages) over time. Discrepancies can indicate an issue that needs addressing before it becomes a major problem. A good battery monitor shunt is invaluable for this.
Crucial Safety and Performance Considerations
Wiring your batteries correctly is a big step, but ensuring the safety and optimal performance of your off-grid solar system extends beyond just connecting terminals. Two key areas demand meticulous attention: proper cable sizing and strategic fusing. Neglecting these can turn your dream of off-grid independence into a dangerous nightmare.
Cable Sizing and Fusing: Non-Negotiables
Think of your battery cables as the arteries of your off-grid system, and fuses/breakers as the emergency shut-off valves. You wouldn't want blocked arteries or faulty valves, right?
-
Why Cable Sizing Matters:
- Voltage Drop: Electricity encounters resistance as it travels through wires. Thinner wires have higher resistance, leading to a "voltage drop." This means less power actually reaches your inverter or appliances, leading to inefficiency and potentially damaging your equipment. Imagine trying to drink water through a tiny straw – you get less flow, and it takes more effort.
- Overheating and Fire Risk: When too much current flows through a wire that's too thin for its gauge, the wire heats up. This isn't just inefficient; it's a serious fire hazard. Properly sized cables can safely carry the maximum expected current without getting excessively hot.
- Calculating Cable Gauge (AWG): The American Wire Gauge (AWG) system dictates wire thickness; a smaller AWG number means a thicker wire. To calculate the right gauge, you need to consider:
- Current (Amps): The maximum current your batteries will discharge or charge. This is often the continuous rating of your inverter or charge controller, plus a buffer.
- Distance (Feet): The total length of the cable run (from battery positive to inverter/charge controller positive, and then back from negative to negative). Longer runs require thicker cables to minimize voltage drop.
- Voltage (V): Higher voltage systems (like 48V) require less current for the same power, often allowing for thinner cables than 12V systems.
- Acceptable Voltage Drop: Typically, you aim for a voltage drop of no more than 2-3% for DC circuits. Online calculators or tables are invaluable for this; for example, if you need 100 amps over a 10-foot round trip for a 12V system, you'd be looking at something substantial like 00 AWG (also known as 2/0). For a 48V system, you could likely use thinner cables for the same power, reducing your overall wiring costs.
-
Fuses and Breakers: Your System's Lifeguards:
- Overcurrent Protection: Fuses and circuit breakers are designed to be the weakest link in your electrical circuit, but in a good way! If an unexpected surge of current occurs (e.g., due to a short circuit or equipment malfunction), the fuse blows or the breaker trips, safely interrupting the flow of electricity and preventing damage to your expensive components or, worse, a fire.
- Placement is Key:
- Main Battery Bank Fuse: This is absolutely essential. It should be placed on the positive lead as close as possible to your battery bank's main positive terminal, before your inverter or charge controller. This protects the entire system from the enormous current your battery bank can deliver in a fault.
- Charge Controller Input/Output Fuses: Many charge controllers have built-in protection, but external fuses for the solar panel input and battery output can add an extra layer of safety.
- Inverter Input Fuse: Similar to the main battery fuse, a fuse or breaker at the inverter's DC input protects the inverter from battery overcurrent.
- Individual Parallel String Fuses: As mentioned, if you have multiple parallel strings, fusing each string individually offers protection against a fault within one string affecting the others.
- Sizing Fuses: Fuses should be sized slightly above the normal operating current of the circuit they protect, but well below the maximum current the wires and components can safely handle. Always consult the specifications of your inverter, charge controller, and wire gauge. A 2000W 12V inverter, for instance, draws approximately 166 amps (2000W / 12V). You'd need a fuse rated higher than that, perhaps 200-250 amps, and cable capable of handling that current continuously. You can find high-quality fuses, fuse holders, and DC breakers from reputable brands on Amazon and through specialized off-grid suppliers.
Battery Health and Longevity
Wiring isn't just about getting power; it's about making sure your investment in batteries lasts as long as possible. Poor wiring practices can dramatically shorten your battery bank's lifespan, costing you more money and frustration in the long run.
-
The Importance of Matching Batteries:
- Type and Chemistry: Never mix different battery types (e.g., lead-acid with lithium, AGM with flooded). Each chemistry has unique charging and discharging characteristics that are incompatible when wired together.
- Age and Capacity: It's paramount that all batteries in a bank (especially in parallel or series-parallel) are of the same age and rated capacity. A weaker, older, or smaller capacity battery will act as a bottleneck, being overcharged or over-discharged as it tries to keep up with the stronger ones. This leads to premature failure of the weakest link and drags down the performance of the entire bank. If one battery fails early, it often takes others with it.
- Brand and Model: While not strictly mandatory as long as type, age, and capacity are identical, using the same brand and model helps ensure consistent internal resistance and performance, which is ideal for a balanced battery bank. When considering the cost of an off-grid solar battery bank, remember that initial savings on mismatched batteries can lead to much higher replacement costs down the road.
-
Mitigating Voltage Imbalances:
- Series Imbalance: In a series string, if one battery has slightly less capacity or higher internal resistance, it will discharge faster and charge slower than the others. This can lead to that single battery being over-discharged (damaging it) or overcharged (also damaging it) while the others are still fine. A good Battery Management System (BMS) in lithium batteries actively balances cells, preventing this. For lead-acid, regular monitoring and occasional "equalization" charges (if recommended by the manufacturer) can help.
- Parallel Imbalance: As discussed, unequal cable lengths in parallel strings can cause certain batteries to work harder, leading to faster degradation. Symmetrical wiring is the best defense here.
- Active Balancing: For very large lead-acid banks or complex series-parallel setups, external battery balancers can be installed. These devices monitor the voltage of individual batteries or series strings and shunt small amounts of current between them to keep them balanced.
- Regular Inspections: Periodically inspect your battery terminals and cables for corrosion, loose connections, or signs of overheating. A loose connection acts like a resistor, creating heat and voltage drop, and can lead to uneven charging and discharging across the bank.
By paying close attention to these safety and performance details, you're not just wiring batteries; you're building a reliable, long-lasting foundation for your off-grid lifestyle.
Series vs. Parallel Wiring: A Quick Comparison
To help you visualize the differences and benefits, here’s a quick table summarizing the key aspects of series and parallel battery wiring:
| Feature | Series Wiring | Parallel Wiring |
|---|---|---|
| Purpose | Increases total voltage | Increases total amp-hour capacity |
| Connection | Negative (-) of one to Positive (+) of next | Positive (+) to Positive (+), Negative (-) to Negative (-) |
| Total Voltage | Sum of individual battery voltages | Stays the same as individual battery voltage |
| Total Amps | Stays the same as individual battery's rating | Sum of individual battery amp-hour capacities |
| Power (Wh) | Increases (V x Ah increases) | Increases (V x Ah increases) |
| Cable Sizing | Depends on system voltage & current (lower current for higher V) | Depends on total current (higher current for same V) |
| Primary Use | Matching higher inverter/charge controller voltages (e.g., 24V, 48V) | Increasing energy storage at a given voltage (e.g., more 12V storage) |
| Key Risk | Weaker battery can drag down entire string if not balanced | Unequal current distribution if cables aren't identical or busbars not used |
Disclaimer
The information provided in this guide is for general informational purposes only. Off-grid solar system installation and wiring can be complex and involve high voltages and currents that can be dangerous. Always consult with a qualified electrician or solar professional before attempting any electrical work. Proper safety precautions, including wearing appropriate personal protective equipment and adhering to local electrical codes, must be followed. We are not responsible for any accidents, injuries, or damages resulting from the use or misuse of this information.